Here is my comprehensive step-by-step guide in setting up Yoast SEO on WordPress to maximise your website SEO in Google search engine result pages (SERPs).
SEO is important if you want your site to be indexed properly by Google.
However, many people seemed confused about how to implement it.
WordPress out-of-the-box does a pretty good job of SEO, but if you want to outsmart your competitors, you’ll need some help.
There are three plugins that dominate the WordPress SEO arena, and they are:
- Yoast SEO – Free Version | Pro Version
- All in one SEO Pack – Free Version | Pro Version
- SEOPress – Free Version | Pro Version
Yoast SEO is one of the most popular WordPress plugins of all time never mind being the most popular SEO plugin and it’s my favourite too.
I do not work for Yoast nor is this an affiliate post. It’s just me giving back to the WordPress community.
Setting up Yoast SEO is part of my 14 Things You Must Do Before Launching Your Website guide.
What Does the Yoast SEO Plugin Do?
Simply put, it allows you to take control of your content and helps you to make it more appealing to people reading your posts and hence the search engines.
Google is still the biggest search engine by far, so we’ll concentrate our efforts on that.
Everyone wants to get their content on the first page of Google and having a good copy (post content), post titles, descriptions and keywords, called on-page SEO, will help you achieve that.
This is what Yoast SEO excels at.
Here’s a screenshot of their website.
They claim that everyone can be an SEO expert by using their plugin.
I don’t know about becoming an SEO expert, but it does a very good job.
Keywords and Key Phrases
Before I go any further, I want to let you know that if I use the word “keywords”, then I’m referring to both keywords and key phrases.
A keyword is, of course, one word but when you are optimising content for SEO, it’s often more useful to target a key phrase (multiple words) commonly referred to as long-tail keywords.
What Are the Differences Between the Free and the Premium Versions?
I used the free version for years, and it covers all the basics of what you would need to manipulate and manage your on-page SEO for posts and pages.
I have now started to use the premium plugin on this site and client sites. It gives you the following additional features:
- Target multiple keywords per post (not sure how useful that is – I still prefer to target one keyword per post or page)
- Preview your post in Google, Facebook and Twitter (free only does Google)
- Internal linking suggestions
- Content insights – shows the five most used keywords on the page
- Redirections – 301 old content to your new posts
- Ad-free – no more annoying Yoast product adverts on the plugin pages
- One year of paid support & maintenance – you can raise support tickets for issues
I get the most out of the page previews to Google, Facebook and Twitter.
It’s good to be able to see exactly how your post is going to look on these networks when it’s published and of course, you can change titles and descriptions for each one if you need to.
I wish there were a LinkedIn one too!
Also, I like the internal link suggestions and content insights. Redirections are just a bonus.
Complimentary Premium Plugins
In addition to the premium version of the Yoast SEO plugin, you can also purchase special bolt-on plugins to help your on-page SEO for specific cases.
Yoast Local SEO
Allows you to target SEO for a local business with an office or store in the community.
Yoast Video SEO
Focuses on sharing your video posts to Google Video, Facebook, Twitter and Pinterest. Also makes your videos responsive for smaller devices.
Yoast News SEO
Optimises your posts for sharing to Google News. Actively ping the Google News service when you publish your content.
Yoast WooCommerce SEO
Allows granular control of SEO on WooCommerce products and product pages.
Setting Up Yoast
I’m assuming you know how to install a plugin whether it’s from the WordPress repository or by uploading a zip file.
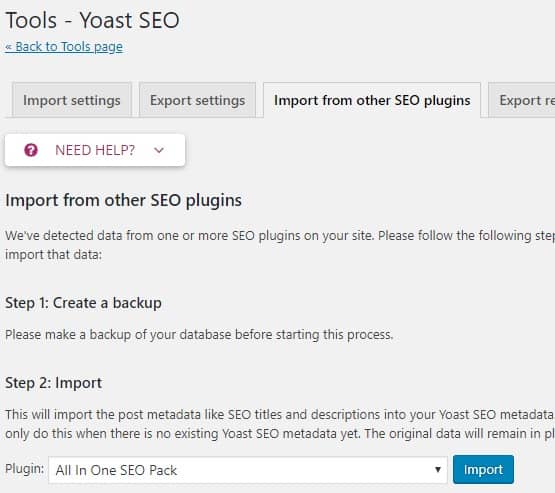
I am also assuming that you are not using any other of the SEO plugins mentioned at the start of this article.
If you are, there’s a good chance you can import their settings into the Yoast plugin. Navigate to SEO > Tools > Import & Export > Import from other SEO plugins.
For first time users, the first thing you are going to want to do once you have activated the plugin is to run the configuration wizard.

This is step 1. Click the “Configure Yoast SEO” button to continue.

Step 2 allows you if this is a live site or one that is under development or in staging.
If you choose “Option B” Yoast SEO will hide your site from all search engines.
This option avoids your development site being indexed and creating duplicate content which has a detrimental effect on your SEO score.

Step 3 asks what type of site you have.
I do sell some things on my site, but it’s not a shop. Checking the corporation box seemed to bring up delusions of grandeur, so I opted to say this site is primarily a blog.
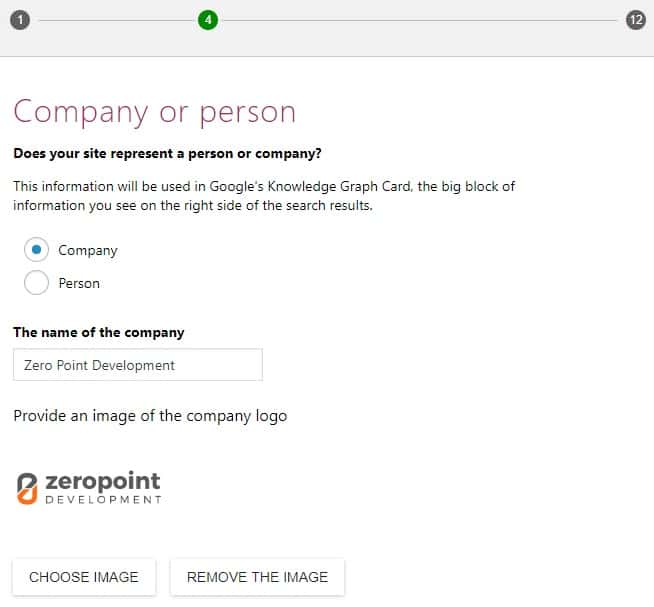
Step 4 asks you if your site represents a company or a person.
You can also upload a company logo if you chose that option.

Step 5 allows you to enter links to some social networks including Facebook, Twitter, YouTube, Instagram and LinkedIn.
It even includes MySpace!!!
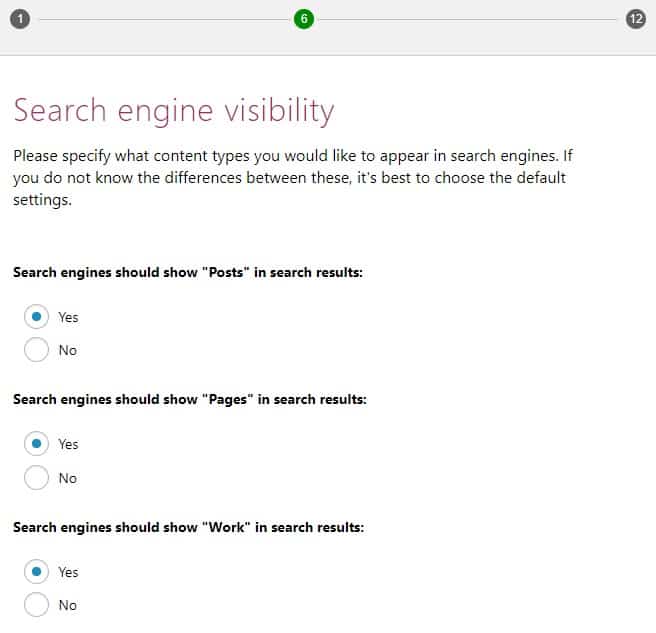
Step 6 asks you what type of posts you want the search engines to index.
By default, WordPress has the content types “posts” and “pages” built in but plugins and themes can add additional content types called Custom Post Types.
You will want to run down the list that appears for your site and mark which ones you want the search engines to show.
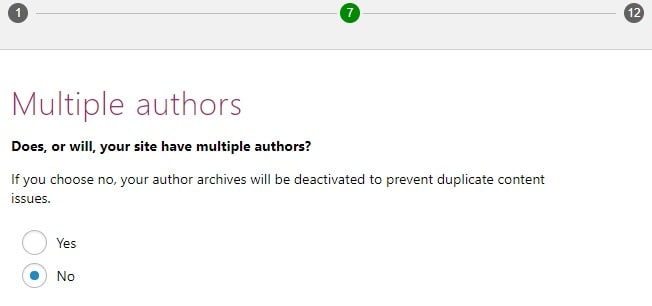
Step 7 asks if your site has multiple people creating content.
Note that if you choose the “No” option, Yoast SEO will redirect your /authors/<name> URL to the homepage of your site.
So, if you want people to click on your name link in a blog post and be redirected to a list of posts by you, choose the “Yes” option.

Step 8 asks you to connect with your Google Search Console account.
If you don’t have a Google Search Console account, you can skip this part and click on next. You can always come back to it at a later date.
I would highly recommend that you do use Google Search Console. It contains a wealth of statistics on what keywords people are using to find your site as well as errors.
If you want to connect, click on the “Get Google Authorisation Code” button.
This opens up a window asking you which Google account to connect to.
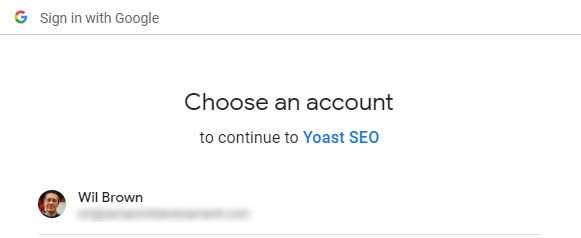

Choose your account and click on the “Allow” button to continue.
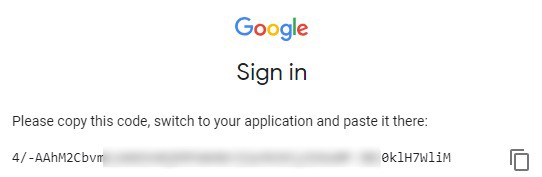
Copy the code from the box into the Yoast SEO wizard field and click on “Authenticate”.
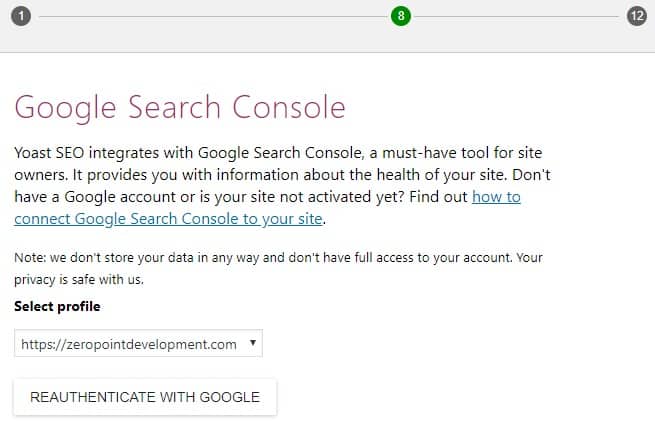
If you have multiple Google accounts, you will be asked to choose which one you want to use with this website in the “Select Profile” drop-down field.
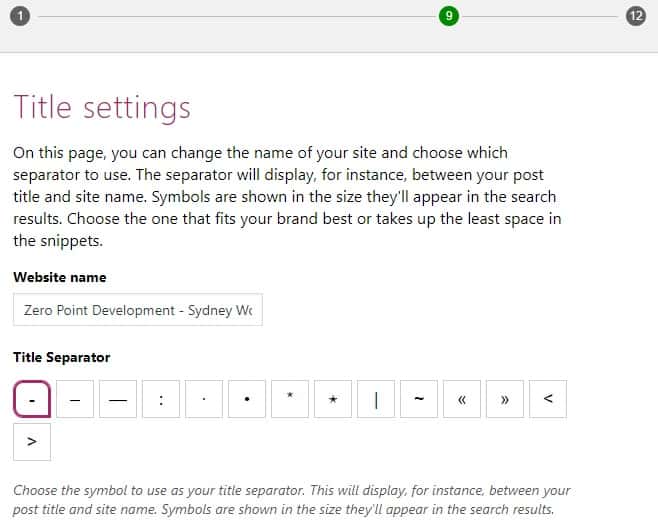
Step 9 allows you to change the website name (defined in Settings > General) and to choose a separator it uses between the post title and the website name.
The separator is pretty irrelevant to SEO, so I left it at the default setting, a dash.
Step 10 has nothing to do with SEO. It’s asking you to sign up to the Yoast newsletter.

You can sign up or skip this part.

Step 11 also has nothing to do with SEO settings — just some additional Yoast information and upselling.
You can skip this part as well.
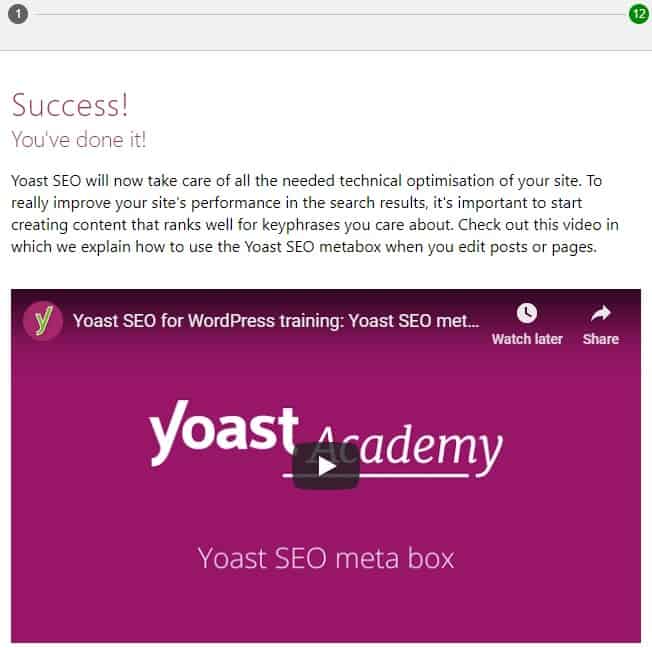
Finally, we’re all done and have made it to the end of the configuration wizard.
The video on this page is well worth a quick watch.
It introduces you to the Yoast meta box which is the main SEO interface you will use for on-page SEO for your posts and pages.
We’re going to get into that now.
The Yoast Meta Box
Here’s the Yoast video introducing the meta box for posts and pages.
Let me step you through all the meta box components.
First, you’ll have to open either a new post or an existing one. Opening a post is preferred as you get the most out of Yoast SEO once you have written your content.
You’ll find the Yoast SEO meta box underneath the main editor window in both the classic editor and Gutenberg.

The first thing you will notice is that the meta box displays a snippet preview of how your post will look in Google for both mobile (default) and desktop search results (click the mobile and desktop icons under the snippet preview).
It pulls in the post title and the site name for the header link and the main content of your post for the description.
It also gives you an overview of how well your article scores for SEO in the form of a traffic signal.
Green is good; amber could be better and red means your on-page SEO needs attention.
More often than not the description that is pulled in from the first 155 characters of your content is not the description that you want to display on Google.
Snippet Editor
If you click on the “Edit snippet” button, you can change the title and the description for Google to display! How cool is that?
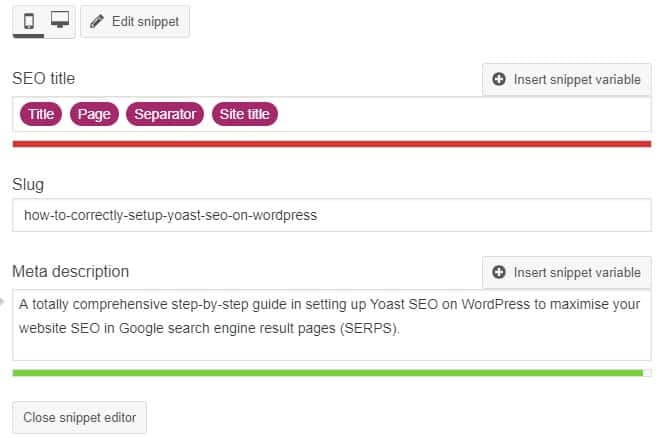
The snippet editor shows the SEO title, the slug and meta description, all important SEO tags that you need to pay attention to.
The title is pretty self-explanatory, and you should keep that short and to the point to grab attention.
You can click on the “Insert snippet variable” button to bring in some site variables such as post title, post category and site title etc.
You will notice that there is a coloured bar underneath both the title and description editors. This indicates if you have the proper number of characters for good SEO.
Titles should be between 50-60 characters, and descriptions should be no longer than 155 characters.
Your meta description should contain the keyword you are targeting with your post content.
Let’s look at that now.
Focus Keyword/Keyphrase
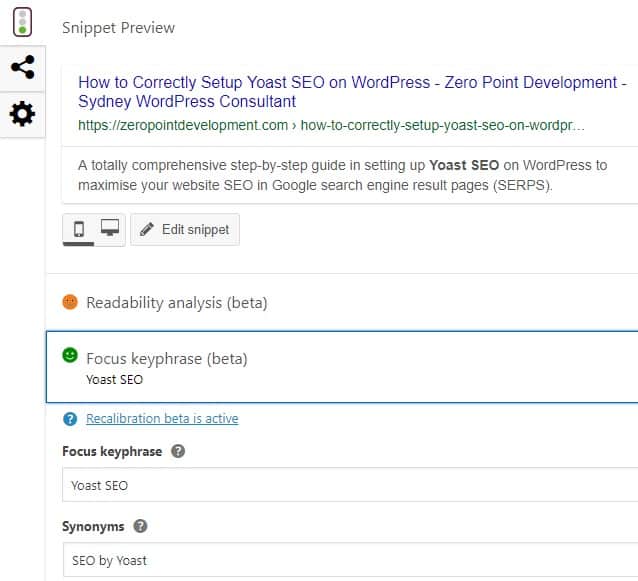
When you expand the “Focus keyphrase” box, you’ll see there are a couple of fields where you can enter the focus keyphrase that your post content is targeting and any relevant synonyms that you want to highlight.
Note: I’m using Yoast SEO Premium so some links and fields may not be there if you are using the free version, but the essentials are still there.
If you look at the screenshot above, I’m targeting the keyword “Yoast SEO” for this article, and you can see it has been bolded in the meta description, confirming that we are using our keyword properly.
Choosing the proper keyword is essential for getting the most out of Yoast SEO as it plays a significant role in the plugin’s readability analysis which is what we will look into next.
Directly underneath the “Focus Keyphrase” section is the “Add Related Keyphrase” section allowing you to target extra keywords for your copy.
I like to keep things simple, and I only focus on a single keyword/keyphrase per post.
Note: when you are writing your post, remember to save it as draft frequently, not only so that you have a backup of your work, but also to allow the plugin to update its readability analysis.
Publish Box SEO Summary
You can see a quick summary of this next to the “Publish” button in the classic editor window.

Readability Analysis
This is my favourite part of Yoast SEO and something that the other SEO plugins don’t do as well in my opinion.

The screenshot above is the readability analysis report of this post as I am writing it, again you may not see some sections if you are using the free plugin, but the basics will be there.
This is a pretty comprehensive report and if you want to take your on-page SEO seriously, address all the problems highlighted in red.
If you don’t understand what it means, click on the link which will more often than not take you a help area on Yoast’s site.
If you click the eye icon, the plugin will highlight the areas of your content that it is finding problematic.
Note: you should come to this section when you have finished writing your article. There’s not much point fixating on it until you have completed your copy.
If you can get all green in this section, your article is considered well optimised for SEO.
Cornerstone Content
I never used this until a year ago.
It allows you to mark a post as having cornerstone content.
This means that you think this article is one of the most important and comprehensive articles you have written.
An article that you can spin off other articles from the same topic.
You can think of a cornerstone article as the top of a pyramid with related articles underneath all linking back to this one.

This post is pretty extensive, so I’m marking it as a cornerstone content post which shows up in the Posts view on the admin dashboard.
Posts View
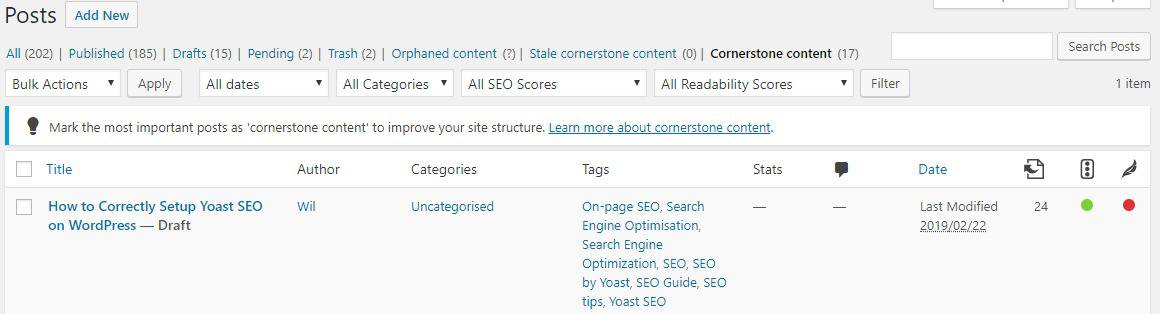
The icons to the right tell you how many internal links the cornerstone content has, 24 in this case, the traffic light is green indicating good SEO, but at time of writing the readability analysis is red – I have more work to do! 🙂
Insights
The insights area of the Yoast meta box gives us a great summary of the most prominent (most used) words in our copy (post content).
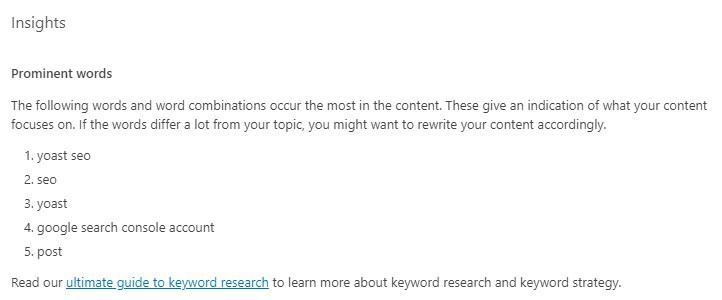
Unlike the readability analysis which you should jump to after your copy is written, I tend to use the insights while writing to make sure I’m on track.
Say, if you are a quarter the way through your article and the keywords in this section are not in line with what you are writing about, then you may have to think about the copy and direction you are going in.
You can see from the screenshot above, at the time of writing I’m fairly confident I’m on track with my copy.
Social Previews
You should visit this section once your article is finished, optimised and ready to be published.
Social networks are so critical for SEO that you need to pay attention to how your post looks once shared.
You don’t want your post title to be cut off or your featured image not to look right. That will detract from people clicking on the link and consuming your content.
Facebook Preview
In this section, you can preview what your post will look like once shared on Facebook.
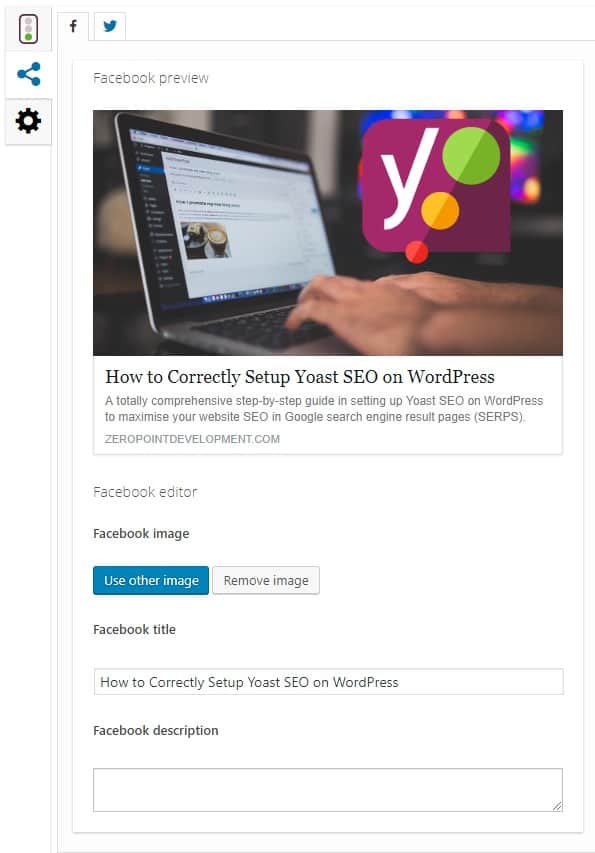
In the screenshot above, you can see I have overridden the default SEO setting for the page title which concatenates the post title with site title.
That is just too long for Facebook.
So, “How to Correctly Setup Yoast SEO on WordPress – Zero Point Development – Sydney WordPress Consultant”, becomes just “How to Correctly Setup Yoast SEO on WordPress”.
I’ve also uploaded a separate image as my featured image size of 750px x 428px is the wrong ratio for Facebook.
Ideally, your Facebook post image should be 1200px x 630px or at least having a ratio of 21:40 (0.525 in decimal).
I left the description – happy with how that looks.
Twitter Preview
Very similar to the Facebook preview described above.
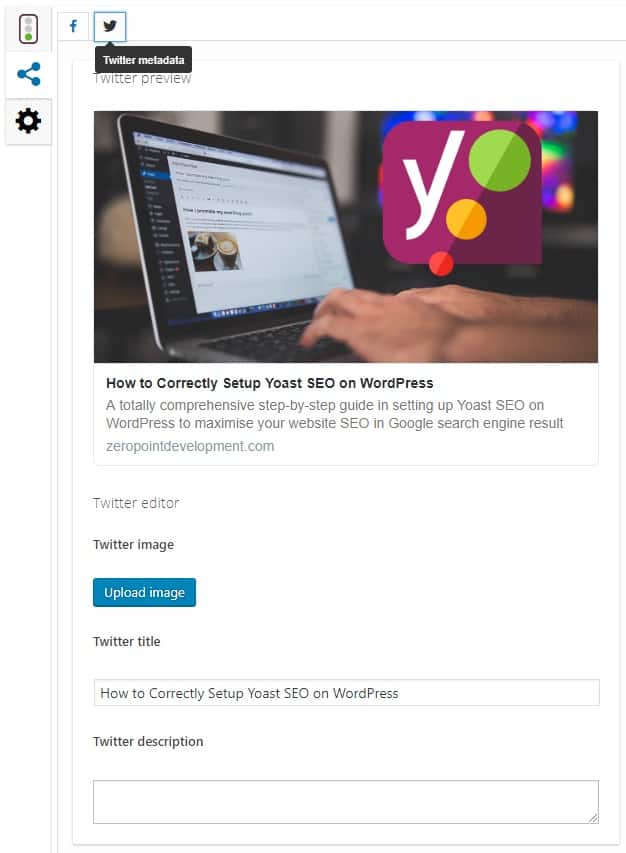
I changed the title again and left the description.
I also uploaded a new image as Twitter post images should be 1024px x 512px or a ratio of 1:2 (0.5 in decimal).
Advanced
The advanced section allows you to change the way search engines find or ignore your post, overriding the site-wide settings you set up during the configuration wizard.
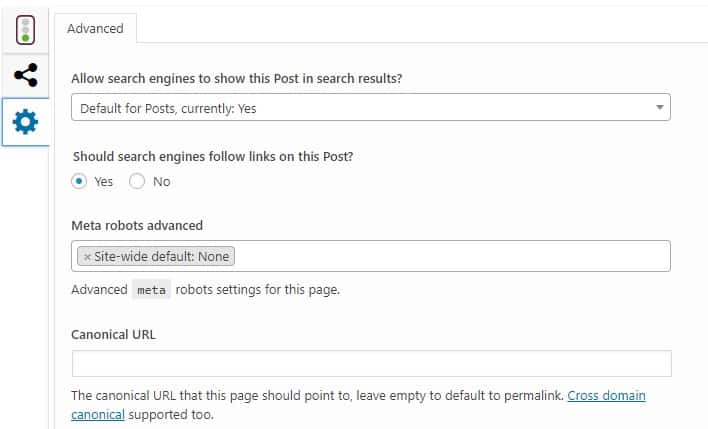
The settings are pretty self-explanatory, except for canonical URLs.
Canonical URLs
If you are new to blogging and SEO, you may not be used to canonical URLs.
Canonical URLs allow you to avoid a negative SEO score for duplicate content.
When would I need to duplicate my articles I hear you say?
If you are running a multi-lingual site, even though your articles are in a different language, if it’s the same content Google will know.
Also, you may want to syndicate your articles on other websites.
For all the duplicate copies of your page, you can set the canonical URL to point to the original article and Google will not penalise your SEO score.
This article is a cornerstone post and the original, so I’m leaving this blank, and Yoast SEO will use the WordPress permalink as the linking URL which is what I want to happen.
Need Help Section
There’s a lot going on in the Yoast meta box, so they provide some very good help for you in the Need Help section.

Here we have links to the intro video tutorial for the Yoast SEO meta box.
There are also links to search the Yoast website knowledge base, raise support tickets (premium) and a list of all the snippet variables you can enter into the snippet title and description.
Yoast Internal Linking (Premium)
If you are running the premium version of the plugin, you will find a handy “Yoast Internal Linking” meta box in the sidebar of the classic editor.
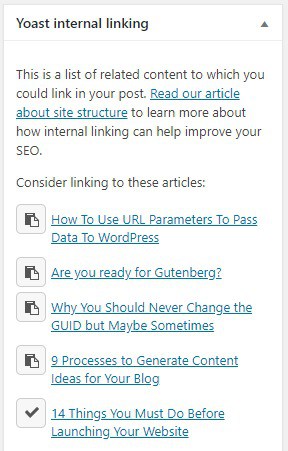
The Yoast plugin will search your existing posts for relevant content that you may want to link to within the article you are writing.
Linking to your existing posts is a good thing to do for on-page SEO.
From the screenshot above you can see that I’ve linked to one of my previous posts on launching a website as SEO is part of that process.
Yoast Dashboard
As well as the meta box on your posts and pages, Yoast will generally analyse your site and content in the background.
Often you’ll see that there are notices and problems for you to check.
![]()
![]()
You can view these on the Yoast Dashboard if you navigate to SEO > General in the WordPress admin dashboard.
Or you can get there from the admin bar drop-down under SEO.
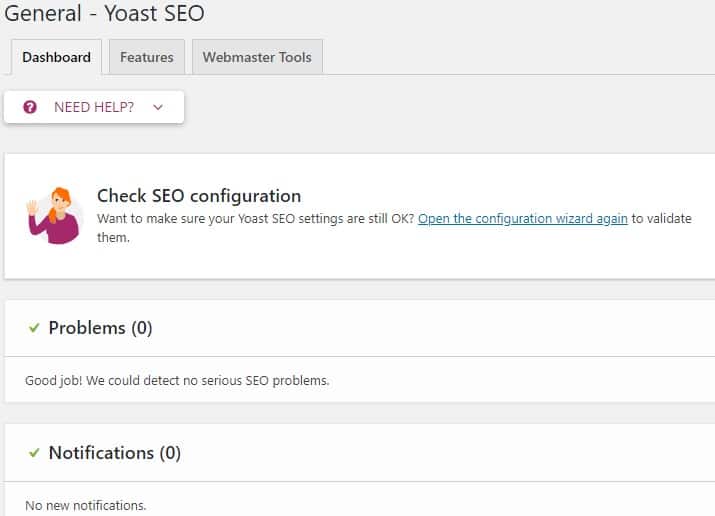
Yoast will let you know if it detects any SEO problems here and will guide you through fixing them.
The “Features” tab allows you to turn the plugin features on or off.
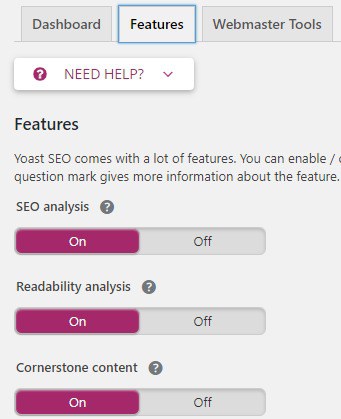
The free plugin will have fewer features displayed.
Finally the “Webmaster Tools” tab.
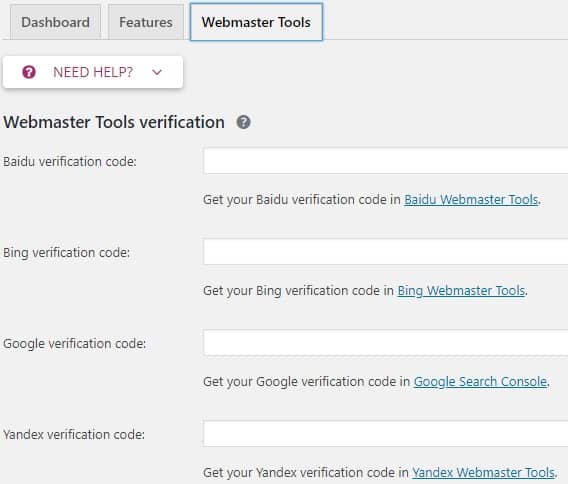
You can add your verification codes for various search engine consoles and services from Google, Bing and others.
I only really use Google Search Console as my Google Analytics data tell me 99% of visitors come from Google.
Search Appearance
In this section, you have fine control over the different content types of your site such as post types, categories etc. and how to include them in SEO.
Some of the information in this section was set up by the configuration wizard we used earlier.
General
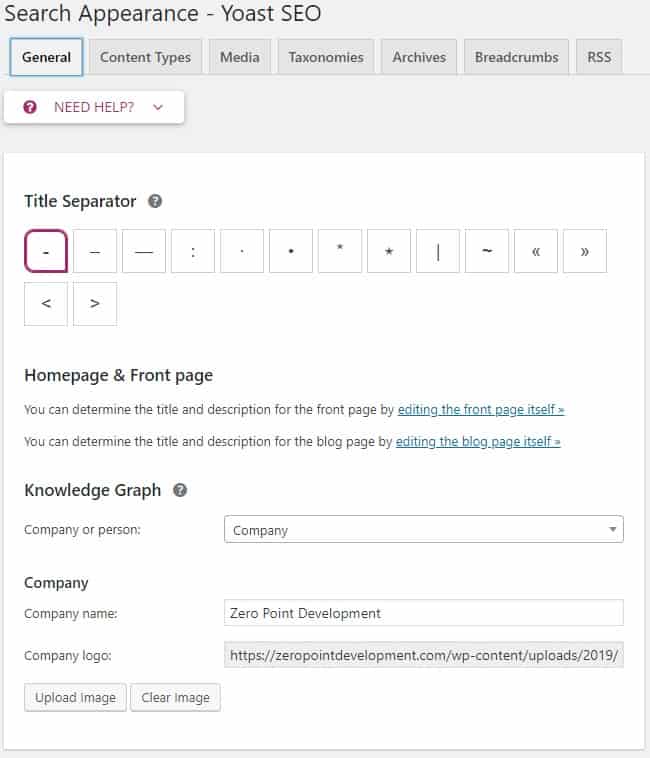
In the general section, you can change the title separator, set the site up for a company or a personal site and add those details.
There are also links to the homepage and blog page so that you can change the SEO settings for those individually.
Content Types
This section allows you to tell the plugin which post types you want to be included in SEO indexing.
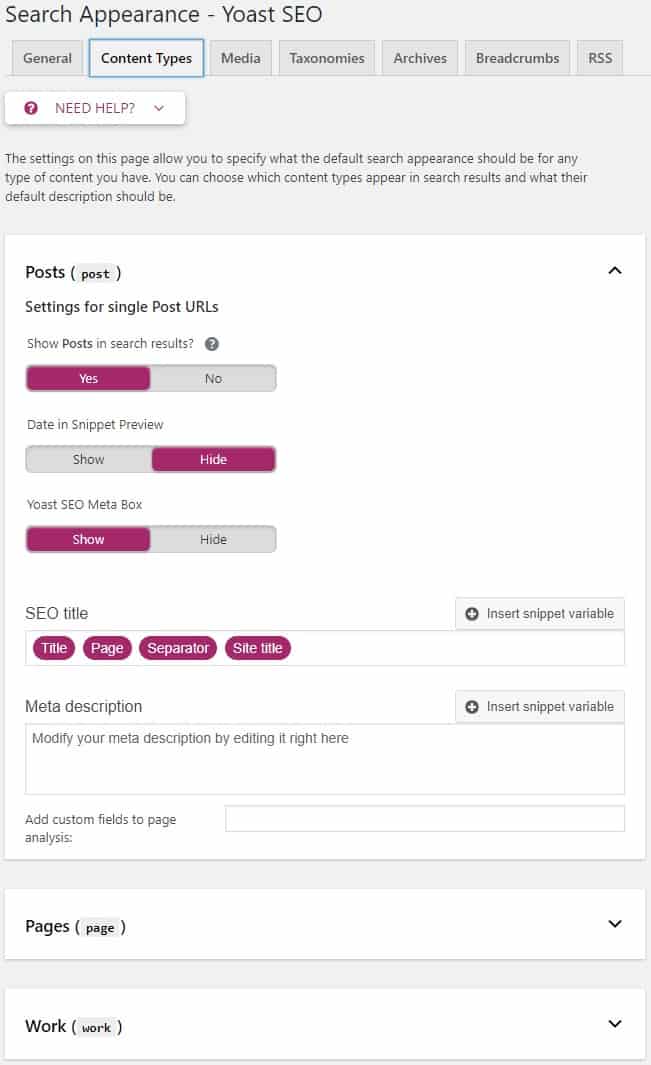
Posts and pages are the default WordPress content types, but you may have more depending on your installed theme and plugins.
If you make use of custom fields, you can add them here, and Yoast will include them in the overall content analysis.
Media
The plugin recommends that media (images, audio, documents) are also indexed for SEO.
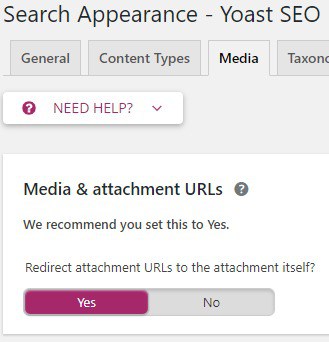
This is a personal preference.
If you have public resources and documents that can be indexed it is useful to include them in the overall site SEO.
Image names can also help boost the overall SEO for the site.
Taxonomies
Taxonomies are the method for grouping WordPress posts.
Categories and tags are the default WordPress taxonomies, but you may have others depending on your installed theme and plugins.
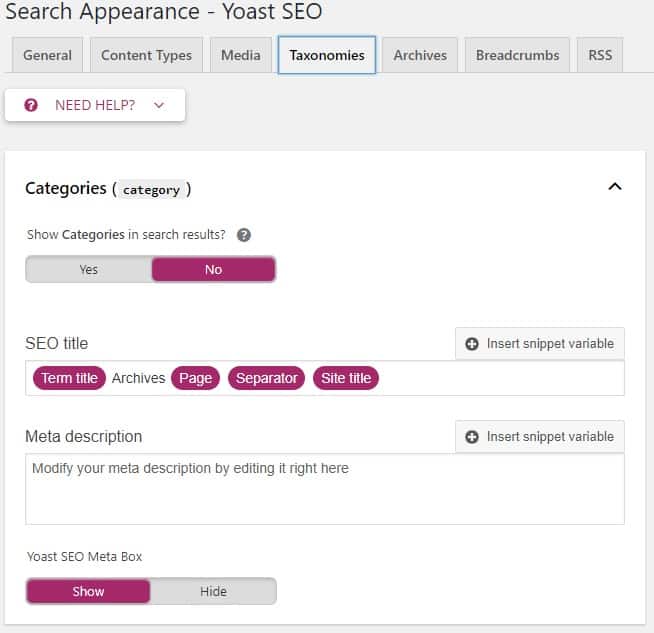
You can determine which taxonomies you want Google to index in the search.
I’m not particularly bothered about Google indexing my taxonomy archives.
I would rather just pages and the posts themselves to the indexed, so I have turned these off.
The Yoast meta box is also available on all taxonomy pages, so if you did want to index them, you could change the SEO settings when editing your categories, tags and other custom taxonomies.
Archives
The archives tab gives you similar control over your archives as the taxonomies tab.
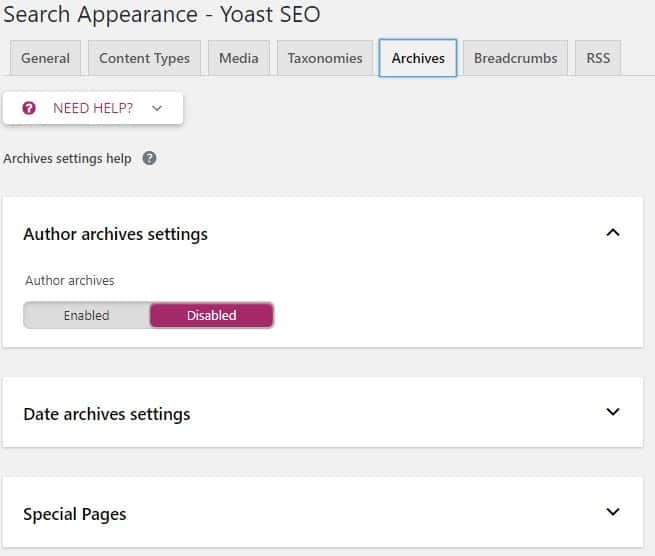
My author archive is disabled, so I don’t index those.
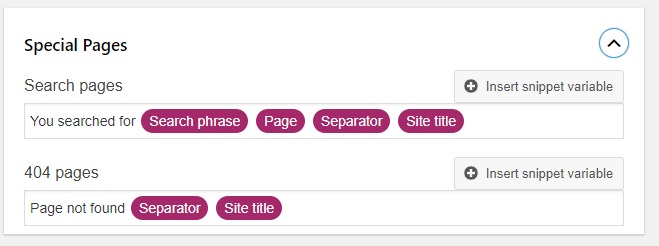
The special pages give you access to SEO for the search pages when people perform searches on your content and for the 404 page when URL links are broken.
Breadcrumbs
Breadcrumbs give your site visitors a visual navigation aid so they can see where they are on your site.

They are especially useful if you have a lot of depth to your content with subcategories.
I’m over breadcrumbs, plus this site has a pretty flat structure, so I have this option disabled.
If you do want to use this feature, you will have to click the link to the knowledge-base article which tells you how to implement it.
Warning: you will have to copy some code to your theme’s functions.php file!
RSS
I still find RSS feeds useful and having them as a secondary SEO indexing source I think is beneficial.
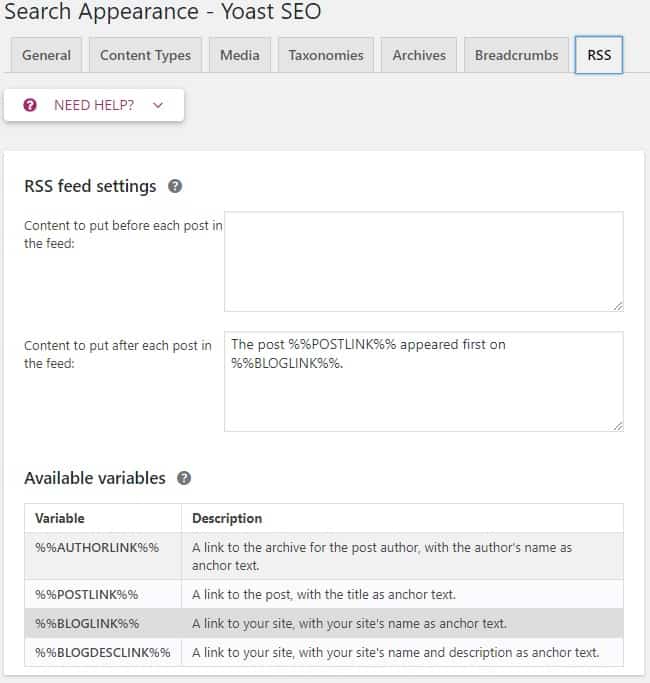
This section allows you to modify the way post content appears in your RSS feed.
Search Console
If you linked your Google Search Console from the configuration wizard at the beginning of this article, you can find your 404-page errors here and fix them up.

If you didn’t link the Google Search Console in the configuration wizard, you could do it now from the settings tab.
I’m not going to go through all the other tabs; they just break down errors by device type, desktop, smartphone and feature phone, whatever that may be.
Social
This section, of course, allows you to link to your social network accounts and set up some SEO defaults for them.

Once you have entered the URL of the social network into the correct field and saved the settings page, you will find a tab for each social network allowing granular control of SEO settings for each.
I won’t run through all the social network tabs. They all contain roughly the same settings.
Here is the Facebook tab.
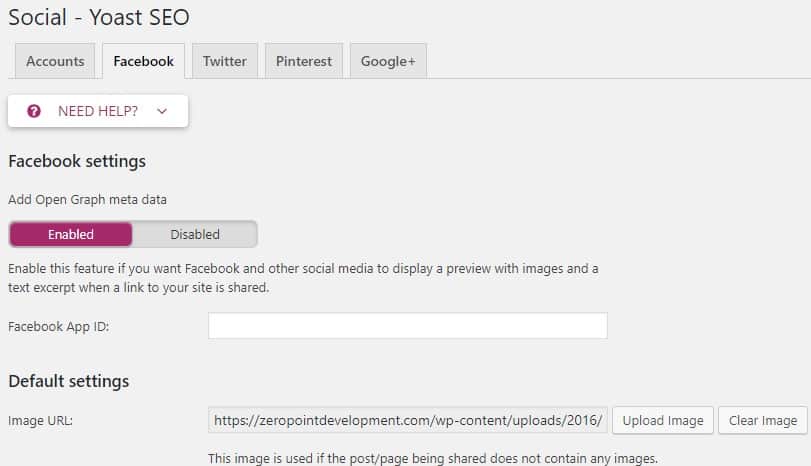
If you are posting to a particular Facebook App that you have created or that your company uses, you can add that App ID here.
Also useful is being able to add a default image to use if your post does not have a featured image. This is optional, but I use it.
Note: at time of writing Google+ is being shut down for personal use so that option is likely going to disappear in future Yoast SEO plugin versions.
Tools
This section gives you some tools to work with bulk posts, imports and exports and site-wide analysis.
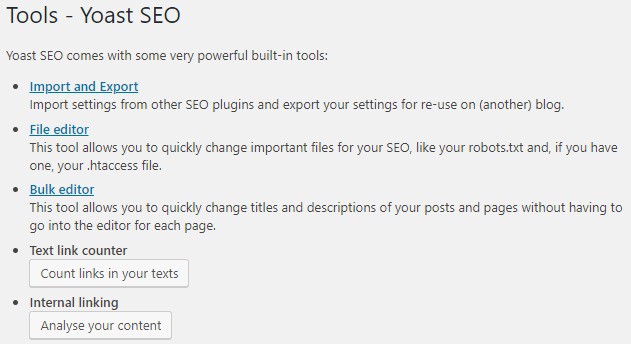
Import and Export
A suite of tools to manage the import and export of plugin settings, keyphrases, redirects and other SEO plugins.
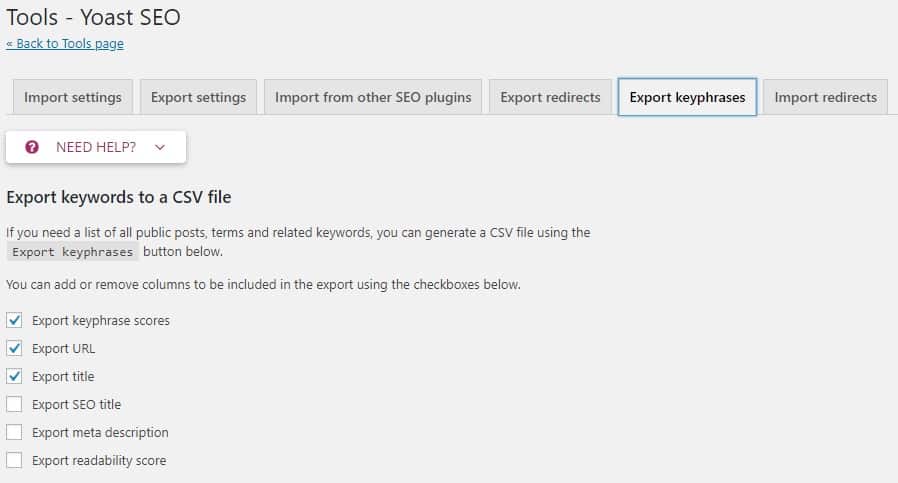
The tabs are pretty self-explanatory.
I love it when plugin authors go that extra mile to import and export useful data like this.
I find the export keyphrases tab the most useful here as I can compare and use the keywords in my site content to those I use for digital marketing.
File Editor
This is a useful tool for being able to update files like your robots.txt or .htaccess if you don’t like to or can’t access those files using your hosting company control panel.
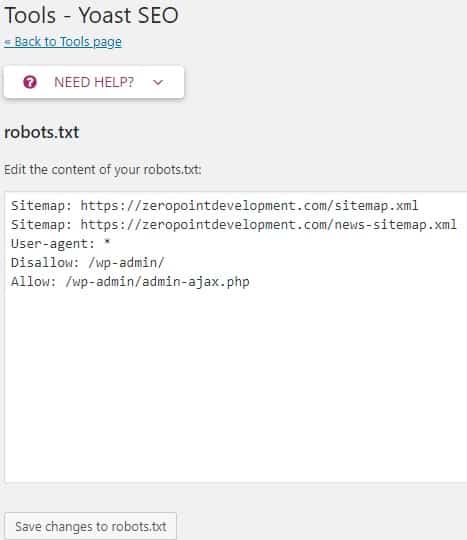
Please be careful when editing these files, as one wrongly placed comma or missing semi-colon can crash your website.
Bulk Editor
This is a useful too if you are installing Yoast on a site with a lot of existing content.

Using the Title and Description tabs, you can scroll through all your content and quickly add new SEO titles or SEO descriptions for all your content.
It will save time from having to open up each post for edit individually.
Text Link Counter
When you click on the button, a window pops up and counts all the links in your posts.
I assume it is stored somewhere in the database as nothing happens except you get a “Good job! All the links in your texts have been counted.” message after it completes.
Internal Linking
Similar to the above Text Link Counter, this opens an analysis popup window and generates content for the Internal Linking meta box.
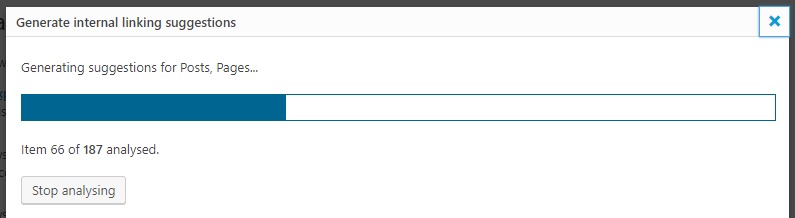
Warning: this can take a long time if you have a decent amount of content.
It took about 30 minutes to analyse my 187 posts and put a fair dent in the server CPU and memory resources.
I would suggest you don’t do this regularly and certainly not during peak activity on your site.
Premium & Courses
You will likely see views for premium and courses.
These are sales pages to get you to upgrade to the premium version of the plugin and to purchase video courses.
They are not part of the SEO for your site so do with them whatever you wish.
If you think the courses will benefit you that’s great. I haven’t purchased any to date.
Redirects (Premium)
If you have been blogging for long or your site has been around for a few years, then you’ll likely already know about redirecting content.
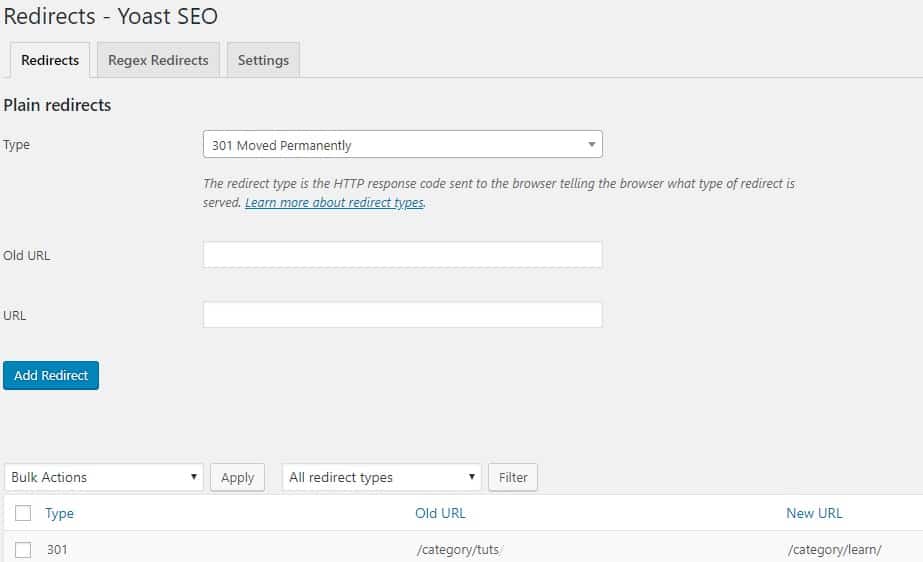
Once content is indexed by the search engines, if you change the URL at some point, you are going to lose that SEO goodness.
It’s quite common to move pages around and change categories throughout the years.
This section allows you to tell the search engines that your old content can be found at another location.
So, rather than generate a 404 error, your old content URL is redirected to the correct new page.
AMP
If you have Yoasts AMP plugin installed for Google’s Accelerated Mobile Pages, you will see a link in the Yoast SEO settings.
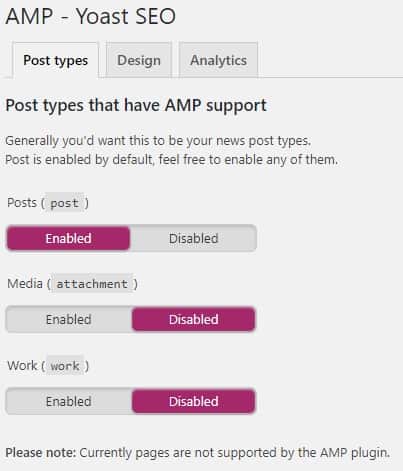
I like to give my site visitors access to AMP, and I’m a big fan of using it to read content elsewhere.
It cuts out all the shiz and lets them read post content easily.
You can determine which post types use AMP, and set a basic design of how they are displayed in the “Design” tab.
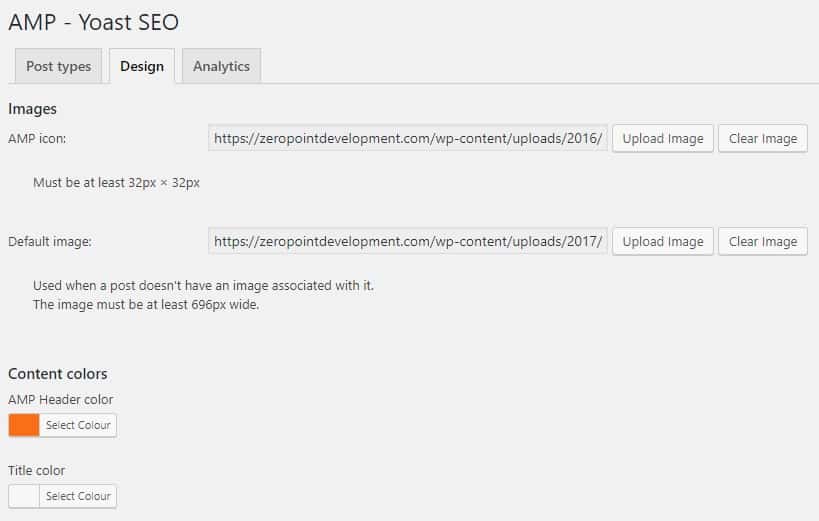
Because AMP is designed to cut down on clutter, there are not very many design options, but you can style it to follow your branding.
You can also track AMP pages in Google Analytics by adding their tracking code in the “Analytics” tab.
Conclusion
That’s it my friends.
I hope you enjoy and fin this comprehensive guide to the Yoast SEO (Premium) plugin for the classic editor in WordPress useful.
I may add some Gutenberg edits at a later stage when and if Yoast moves completely over to that editor.
Go and SEO the socks off your site content!


