In this lunchtime #WPQuickies, I show you how to add WooCommerce customer and order data into your Stripe credit card transactions as metadata.
How cool would it be to receive notifications from your WordPress website on your Amazon Echo device?
Today, I’m going to show you how to get started with sending notifications from WordPress to Amazon’s Alexa using webhooks.
Specifically, I’ll be showing you how to send a notification from a Gravity Forms submission and a WooCommerce order.
You don’t have to be a developer to use the code in this presentation – it will work if you cut and paste it into the correct areas specified.
However, this is an advanced topic, so if you are a beginner, don’t get bogged down if you don’t understand everything yet – we were all beginners once!
What Are Webhooks?
If you missed my WooCommerce Webhooks WPQuickies, watch the replay for a more detailed explanation of webhooks.
In summary, a webhook is a fancy way of saying an HTTP request, the protocol that pushes and pulls website data.
Today we are pushing data from WordPress to Amazon – this is called a webhook push or an HTTP POST request.
Service Layers
Before we get started with the code, let’s review what we are trying to achieve.
We have WordPress as the first “layer” and Amazon’s Echo as the final layer.
In order to talk to Amazon’s Echo API, this requires a lot of authentication, API keys and the development of a new “skill” for Alexa to learn.
That’s a lot of work and I do encourage you to learn more about developing Alexa skills.
However, we don’t have time for that in today’s WPQuickies so we are going to take a shortcut and use an existing skill and service called NotifyMe from Thomptronics.
Notify Me Alexa Skill
The Notify Me Alexa skill simplifies the process of sending notifications to your Amazon Echo device using a simple API and secret key.
Log in to your Amazon store and search the “Notify Me Skill” – it’s free.
I’m not going to cover setting up the skill on your Amazon device – just a note that it took me about two minutes to complete.
Remember to open or launch the skill (“Alexa, open Notify Me” or “Alexa, launch the Notify Me skill”).
This will trigger the Notify Me skill to send you an email with your setup instructions, your super-secret access code (API key) and a link to the documentation at https://www.thomptronics.com/about/notify-me.
Suffice to say that you should not share your Notify Me access code with anyone, otherwise they have direct access to push notifications to your Amazon Echo.
Using The Notify Me API
The Notify Me API is super simple to use, here are the webhook specs:
URL: https://api.notifymyecho.com/v1/NotifyMe
Port: 433 (if required)
Method: POST | PUT | GET (use POST)
URL Params (optional if you use Data Params)
     notification=string
     accessCode=ACCESS_CODE
     title=string
The title parameter is optional.
Data (body) Params (optional if you use URL Params)
    {
      "notification": "string",
      "accessCode": "ACCESS_CODE",
      "title": "string"  // optional parameter
    }
Here is an example URL request with a fake access code:
https://api.notifymyecho.com/v1/NotifyMe?notification=Hello%20World!&accessCode=amzn1.ask.account.1234567890
Sending A Gravity Form Submission Notification
For this example, I am using Gravity Forms with the Elite subscription to get the webhooks addon.

Once the webhooks addon plugin has been activated, navigate to the form you want to send notifications from and into the settings > webhooks area.
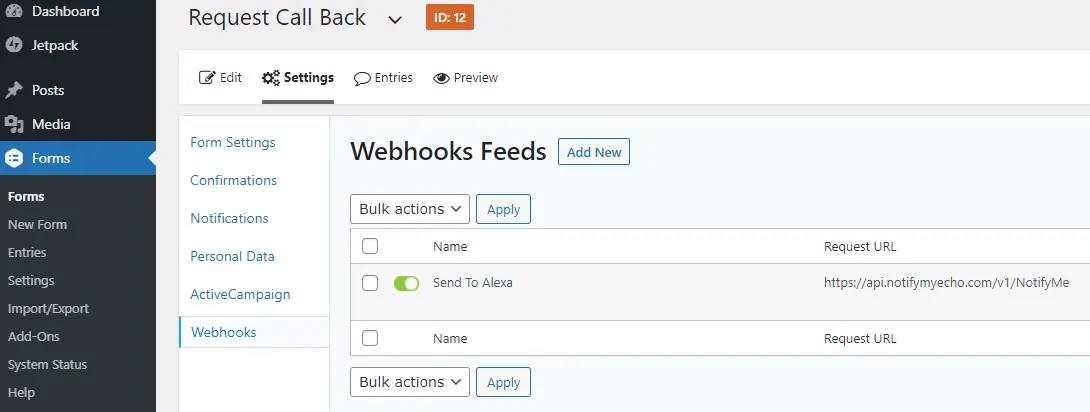
You can see from the image above that I have created a new webhook feed in the form settings.
I’ve named this one “Send to Alexa” and you can see the webhook request API URL from Notify Me.
Let’s test out the form – I’m using preview mode which works the same as on the live site.

Let’s have a look at the webhook feed settings so you can understand how to set this up.
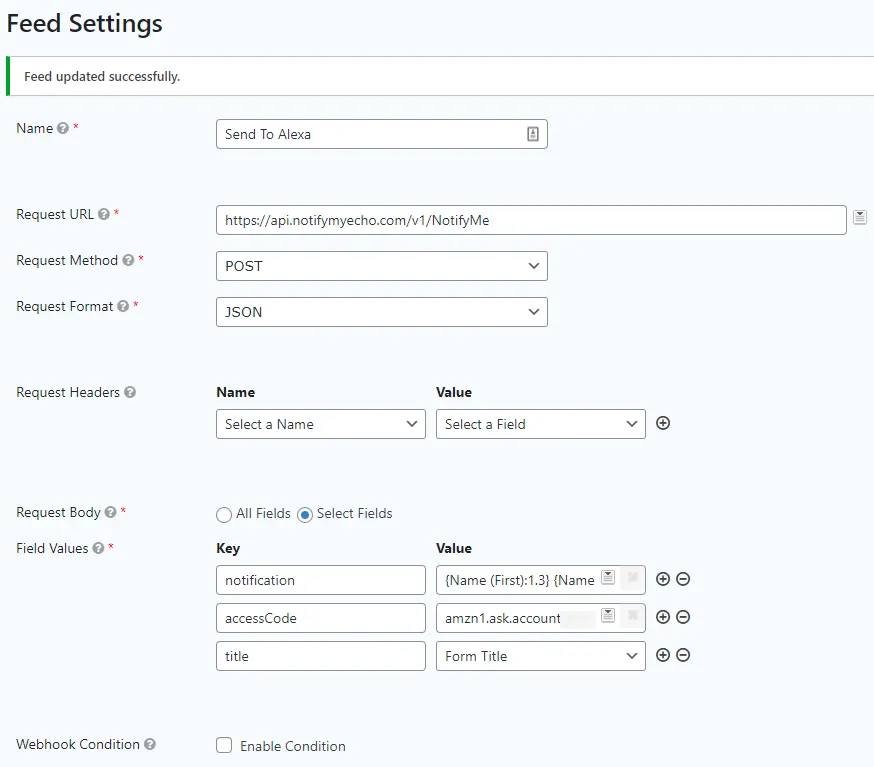
Most of the fields should be self-explanatory.
- Name: this is the name of the webhook feed
- Request URL: this is the Notify Me webhook URL
- Request Method: set this to “POST”
- Request Format: set this to “JSON”
- Request Headers: leave these blank
- Request Body: choose “Select Fields”
- Field Values: these are the key/value pairings.
- Key “notification”: this is the notification text you want Alexa to speak
- Key “accessCode”: your secret access code from the Notify Me skill
- Key “title”: you can omit this – it’s not required
- Webhook Condition: I left this blank but you can add conditions if you need to
I’ve blurred out the start of my “acccessCode” value for security reasons.
The “notification” value field on the form is quite small in the image, here’s the complete value which represents the notification we want Alexa to speak.
{Name (First):1.3} {Name (Last):1.6} requested a call back on “{Phone:2}” from Zeropoint development website. Best time to call back {Name (First):1.3} is {When is the best time to give you a call?:4}
Note: if you want Alexa to speak a phone number, enclose it in quotes, otherwise she will convert it to a number.
e.g.
0455 555 555 will be spoken as the number 455,555,555 “four hundred and fifty-five million, five hundred and fifty-five thousand, five hundred and fifty-five”.
“0455 555 555″ will be spoken as “zero four double five, triple five, triple five”.
Getting The Gravity Form Field Values
The curly brackets are the Gravity Form field ID’s from the form editor. You can access them from the dropdown selection icon at the end of the value field.
No Gravity Forms Elite License?
If you don’t have a Gravity Forms Elite license, you can achieve the same thing by adding code in your theme’s functions.php that hooks into the Gravity Forms gform_after_submission() API hook and using WordPress’ wp_remote_post() function.
function gf_alexa_notification( $entry, $form ){
    $notifyme_api_url = 'https://api.notifymyecho.com/v1/NotifyMe';
    $notifyme_api_secret = '1234567890';

    if( $form->ID === 12 ){
        // Only for form ID=12
        $firstname = rgar( $entry, '1.3' );
        $lastname = rgar( $entry, '1.3' );
        $phone = rgar( $entry, '2' );
        $notification = $firstname . ' ' . $lastname . ' requested a callback on "' . $phone .'"';

        $args = [
            'notification'  =>  $notification,
            'accessCode'    =>  $notifyme_api_secret,
        ];

        $response = wp_remote_post( $notifyme_api_url, $args );
    }
}
add_action( 'gform_after_submission', 'gf_alexa_notification', 10, 2 );
Sending A WooCommerce Order Notification To Amazon Echo
We first need to set up a webhook. Navigate to WooCommerce > Settings > [Advanced] > Webooks.
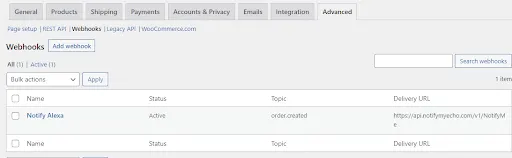
Create a new webhook using the following information:
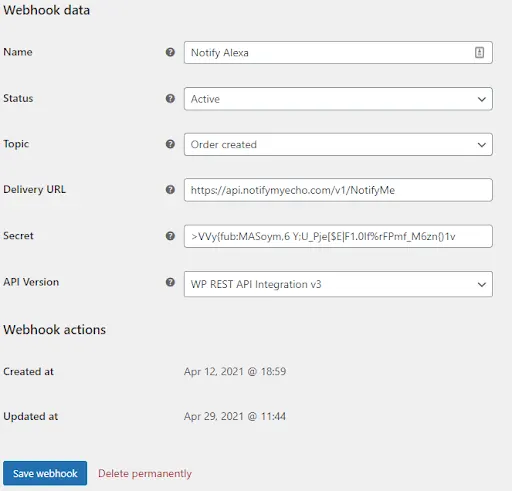
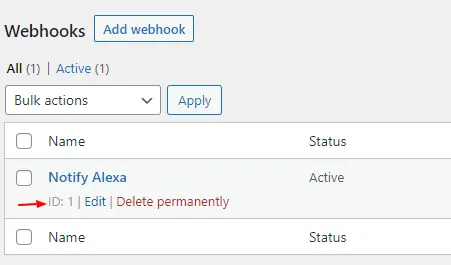
Note the ID of the webhook. You can find the ID by hovering over the edit link in the webhook settings, this one has an ID of one.
Next, we need to add some code to your theme’s functions.php file.
function zpd_wc_order_to_alexa( $payload, $resource, $resource_id, $id){
 if( $id == 1) { // webhook ID is 1
 // Get an instance of the WC_Order object (same as before)
 $order = wc_get_order( $resource_id );

 $payload[ 'accessCode' ] = ZPD_NOTIFYME_SECRET_API_KEY;
 $payload[ 'notification'] = 'There is a new ' . $order->get_status() . ' order';
 $payload[ 'notification'] .= ' on the ' . get_bloginfo( 'name' ) . ' website';
 $payload[ 'notification'] .= '  from ' . $order->get_billing_first_name()  . ' ' . $order->get_billing_last_name() . '.';
 }
 return $payload;
}
add_filter( 'woocommerce_webhook_payload', 'zpd_wc_order_to_alexa', 8, 4 );
Create a new order in the admin area to simulate a real order and wait for your Amazon Alexa to get a notification.
Conclusion
There’s my way to get notifications from Gravity Forms and WooCommerce directly to your Amazon Echo device.
How cool is that!!
Having Trouble Removing Action Hooks and Filters?
Removing WordPress action hooks and filters put in place by other plugins or themes using Object-Oriented (OO) code can be tricky.
Fortunately I have a few ways you can use to try to remove them.
Read my post How To Remove an Action Hook or Filter Added By a Class in WordPress.
#WPQuickies
Join me every Thursday at 1 pm Sydney time for some more WPQuickies – WordPress tips and tricks in thirty minutes or less.
Broadcasting live on YouTube and Facebook.
Suggest a #WPQuickies Topic
If you have an WordPress topic you’d like to see explained in 30 mins or under, fill out the form below.
https://forms.gle/mMWCNd3L2cyDFBA57
Watch Previous WPQuickies
How To Add Custom Metadata To WooCommerce Stripe Purchase


