In this series we’re going to be looking at how to create a tab on your Facebook Page using the iFrame Application Development and pimp it with FB SDK goodies.
Please note that due to Facebook’s almost hourly updates some of this info may already be out of date! 😛
The FB iFrame application explained
A wee while ago Facebook (FB) changed the way content is displayed on pages (FB changed something? – no way!)
Out went FBML and in came iFrames allowing you to embed content from an external source directly on your FB page.
You can think of the FB page as being a big frame and your content is displayed in a window within the page “frame”.
Your “index” or “canvas” content is hosted externally from FB itself and that means the content can live directly on your website or wherever else you choose.
This means that you have access to CSS, HTML, JavaScript and anything else that you would normally use to build web content (with a few restrictions of course).
To access FB related information such as Like or Shares you will be using one of the Facebook Software Development Kits (SDKs).
You will need to know how to create web pages using HTML, CSS, PHP and Javascript so this is not for the noob but I’ll explain things as clear as I can as we go through the steps.
You will also need an external site on which to host your pages. As long as you can see the content in a browser, that’ll work.
BIG HUGE NOTE: When developing an iFrame application FB needs to be able to access the content securely via SSL.
This means using https:// and that will require that you have an SSL certificate installed on the external site you are placing the page content on.
If your content can’t be accessed securely then FB users will get an error message similar to the one below.

You can buy the cheapest SSL certificate for development purposes – approx $30/year.
Creating your first iFrame application
First thing you need to do is create a space on your secure server for your pages.
e.g. /public_html/facebook/mynewapp/
All of your pages and related resources such as CSS, JavaScript, image files will go in here or a subdirectory of it.
We’re assuming you know how to ftp files up to a server.
The next thing we create is a basic HTML page to act as our index page, named index.html
[gist id=8143061 file=code-snippet-1.html]
You’ll see from the above code that I’ve linked a css file to the HTML page.
It’s called style.css and lives in a subfolder called css.
[gist id=8143061 file=code-snippet-2.html]
As this is just a test app, there’s not a lot of content going on here.
The main HTML page just contains a H1 header and a paragraphs which the CSS file sets the width of the wrapper div to 800px.
Facebook allows two different sizes for tabs, 520px and 810px. We’re using the larger size here and setting the CSS width of the main weapper just under the max width allowed.
Upload these two files to your secure web server and test them out by using https://yourdomain.com/facebook/mynewapp/
Installing the Facebook Developer app
Now we have to link in the FB stuff and we’ll need to install the Facebook Developer app so login to your FB account and go to http://facebook.com/developers.
The first time you install the app you will see the Request for Permission dialog box.
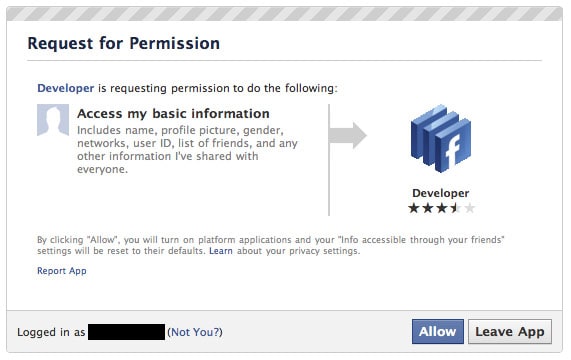
Click Allow to install the app.
Creating the iFrame app
Click on the Create New App button at the top RHS.
![]()
Give your app a name.
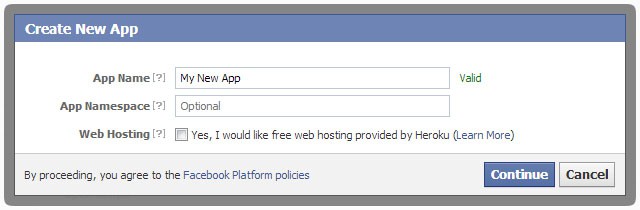
You don’t have to fill in the App Namespace but if you do spaces are not allowed.
Use hyphens instead. It also needs to be unique to FB so you may find it’s already taken – time to be creative.
Note: You can’t use the terms “FB” or “Facebook” within the App Name.
Clicking continue throws up an annoying captcha dialog box that you’ll have to fill in.
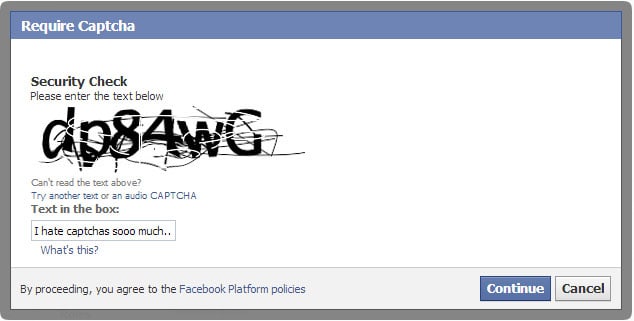
Once that’s done you’ll be taken to your app settings page.
Your app settings
There are heaps of options on the app settings page but we’re only going to play around with those needed to get a basic FB tab up and running.

At the top of the settings page you can see probably the two most important settings for your app, App ID and App Secret.
You’ll need both to properly integrate your app into Facebook. As the App Secret suggests, keep that safe and don’t go sharing it with others as this is the ID your app will use to authenticate itself with Facebook.
You can go ahead and edit your app icon if you want but for this tutorial we’ll just leave it be as we’ll be adding a picture to the tab anyway.
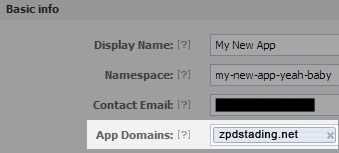
Basic Settings
- Display Name: this should be prefilled with the app name you used in the previous steps.
- Namespace: this should be prefilled with the app name you used in the previous steps.
- Contact Email: the admin email.
- App Domains: this is the domain where we’re hosting the external content. We’ll update this later.
- Hosting URL: Facebook will host your content for a price – we’re not using this today.
- Sandbox Mode: leave this disabled. If you enable it then only app developers will be able to access the content.
Setting up the Page Tab
Open up the Page Tab area.
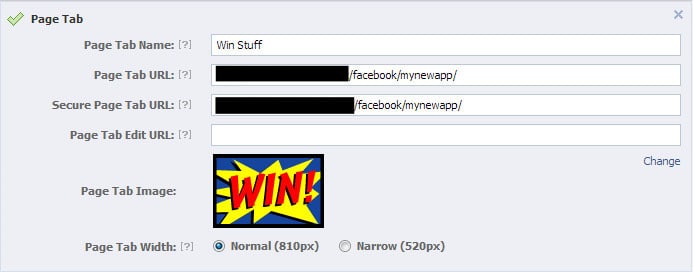
- Page Tab Name: Enter your tab name here
- Page Tab URL: this is the insecure url to your external content – i.e. http://
- Secure Page Tab URL: this is the secure SSL url to to your external content – i.e. https://
- Page Tab Edit URL: leave this blank for now
- Page Tab Image: click the Change option to the right and upload an image from your computer (111 x 74 px)
- Page Tab Width: keep with the widest option (810px)
You can now add your domain into the App Domains basic setting.
If you had tried to add it before populating the Page Tab settings, Facebook would have given you an error.
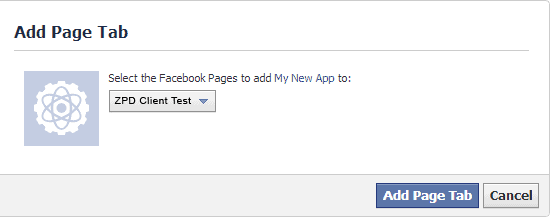
Adding your iFrame app to your Facebook Page as a Tab
In this example we’re just adding a Tab to a FB page. This can be done by entering a specific URL, the format of which is:
https://www.facebook.com/dialog/pagetab?app_id=YOUR_APP_ID&next=YOUR_URLReplace YOUR_APP_ID with your App ID and YOUR_URL with the URL of the page content, in this example it would be:
https://www.facebook.com/dialog/pagetab?app_id=287075391409650&next=https://zpd-staging.net/facebook/mynewapp/Facebook will prompt with where you want to the tab installed to.
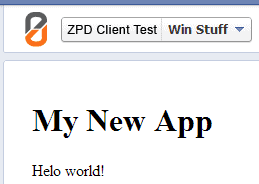
That’s it. Navigate to your page and you should see your new tab.
Using the Facebook SDK
We’ll cover this is the next tutorial, however, if you want to use any of the FB SDKs then you’ll have to add some extra information to your App settings.
Click on the App on Facebook area in the settings.
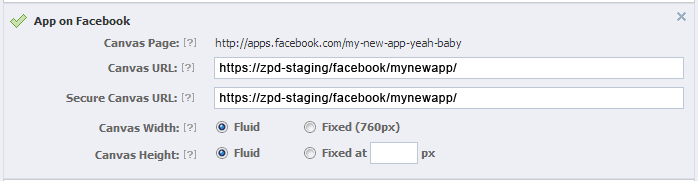
- Canvas URL: this is the folder location URL to your content.
NOTE: this must be a folder and not a page reference, so no ending with .html or php or anything else - Secure Canvas URL: this is the secure folder location SSL URL to your content.
NOTE: this must be a folder and not a page reference, so no ending with .html or php or anything else - Canvas Width/Height: keep these fluid for maximum flexibility

Great tutorial, Wil …
Any date for the Facebook SDK tutorial?
Thanks Douglas,
Christmas and New Year have been hectic but I plan to get back to blogging again regularly and I’ll put together part 2 soon.
Cheerz,
Wil.
I have set my app’s canvas url as the full path to my app as follows but my application still says
“The requested URL /examples/facebook/myapp/ was not found on this server.
Additionally, a 404 Not Found error was encountered while trying to use an ErrorDocument to handle the request.”
please help!!!
great article ….. thanks for this …………….. every thing is fine but my godaddy web server is not https compatible is their any alternate ways to come out of this 🙁
Hey there,
Unfortunately not. It is a requirement of Facebook development that the content needs to be accessible over HTTPS.
Superb Article…….
But it is your greate help if you can teel us “how to add this app on facebook????”
Really nice tutorial, Right now there are some new features on Facebook that are hard to understand for this same process, is there any way that you could update this?
Regards.