Be your own certificate authority (CA) and issue certificates for your local development environment and get HTTPS working on Windows 10 and Windows 11
Edit 25/05/2022: This also works on Windows 11.
As a WordPress developer, I work on a lot of e-commerce and membership projects, developing on my Windows 10 local machine, and I need to test secure areas of the website like checkouts, payment forms and registrations.
These types of forms all require that the data is encrypted by an SSL certificate using HTTPS.
But how do you get HTTPS working in Windows 10? What is the process?
Here is my step-by-step guide to issuing certificates on Windows so that you can run your local development sites in HTTPS.
Install OpenSSL
The very first thing you will need is the executable for OpenSSL.
The executable is not distributed in the Windows installation files so you will have to find and install it manually.
There are a couple of useful resources to get the file from:
Option 1 – Shining Light Productions
Visit https://slproweb.com/products/Win32OpenSSL.html and download the “Win64 OpenSSL v1.1.0j” file and run the installer.
Make sure that the “\bin\” folder of the installation folder you chose for OpenSSL is added to your system PATH environment variable, so it’s available from anywhere.
Option 2 – Git for Windows
The OpenSSL executable is distributed with Git for Windows.
Once installed you will find the openssl.exe file in “\Git\mingw64\bin” which you can add to the system PATH environment variable if it’s not already done.
The Three Steps To Become Your Own Certificate Authority in Windows 10
In these steps, you will create a root SSL certificate that you can use to sign as many local development sites as you need.
You only need to do this first part once.
Once your root SSL is added to Windows 10, you can skip to issuing certificates for all your new local domains.
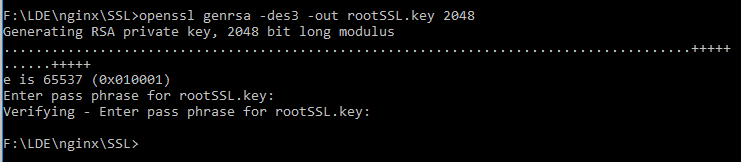
Step 1 – Create a Private Key
We are going to create a private key called rootSSL.key which we will use to issue the new site certificates.
I use the Nginx web server, so I have created a folder called “SSL” in the Nginx windows folder, and that’s where I am going to create this root key.
Open a command prompt in administrator mode and navigate to your newly created SSL folder in the nginx installation folder.
Type in the following command and enter a password for the private key.
openssl genrsa -des3 -out rootSSL.key 2048
Step 2 – Create the Certificate File
In this step, we are going to create a certificate file called rootSSL.pem from the private key we created in the previous step.
Note: you can choose to create a certificate file that lasts for X number of days. We’re going to choose 1024 days in this example, but you can select any amount – the longer, the better.
Type in the following command:
openssl req -x509 -new -nodes -key rootSSL.key -sha256 -days 1024 -out rootSSL.pem
Enter the password for the root SSL key we created in step 1.
Then, enter the information to insert in the SSL certificate:
- Two letter Country code: I use “AU” for Australia.
- Your state or province: I use “NSW” for New South Wales.
- Your city: I use “Sydney”.
- An organisation name: I use “Zero Point Development”.
- An organisational unit name: I use “Development”.
- A common name such as the server name or the fully qualified .domain name (FQDN): I use “zeropointdevelopment.com”.
- An admin email address: I use “[email protected]”.
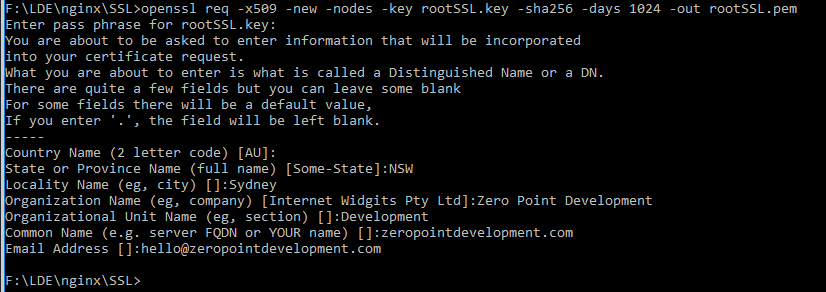
You don’t have to put your legit information in here as we’re only running SSL certificates on the local development environment, but I like to do it properly.
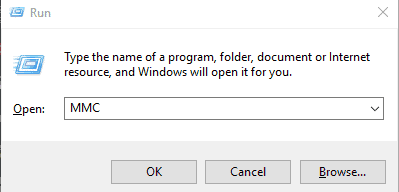
Step 3 – Get Windows to Trust the Certificate Authority (CA)
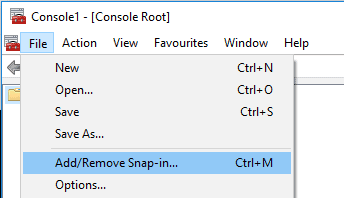
We are going to use the Microsoft Management Console (MMC) to trust the root SSL certificate.
Step 1 – Press the Windows key + R
Step 2 – Type “MMC” and click “OK”
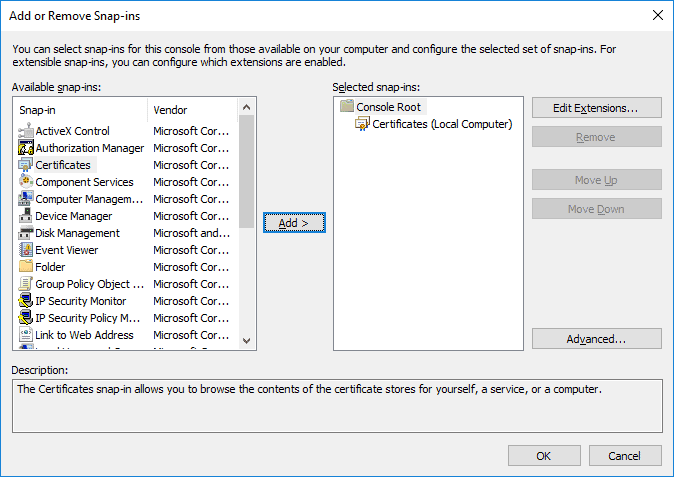
Step 3 – Go to “File > Add/Remove Snap-in”
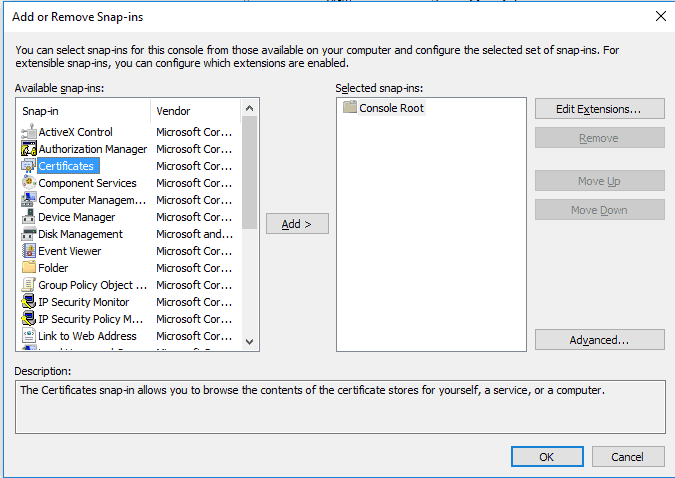
Step 4 – Click “Certificates” and “Add”
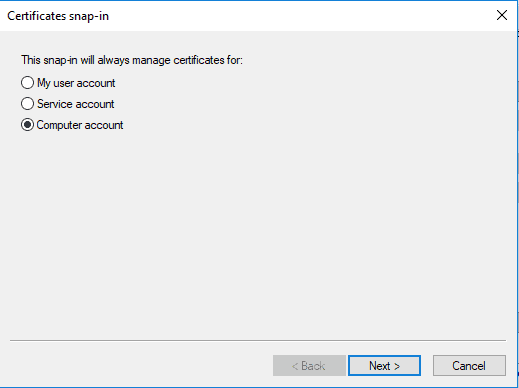
Step 5 – Select “Computer Account” and click “Next”
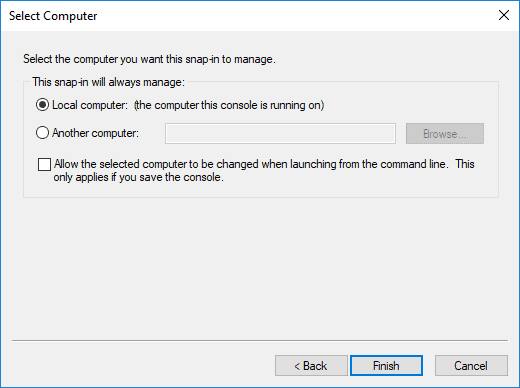
Step 6 – Select “Local Computer” then click “Finish”
Step 7 – Click “OK” to go back to the MMC window
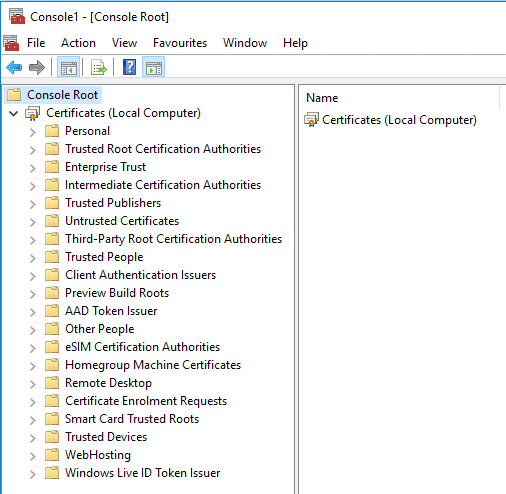
Step 8 – Double-click “Certificates (local computer)” to expand the view
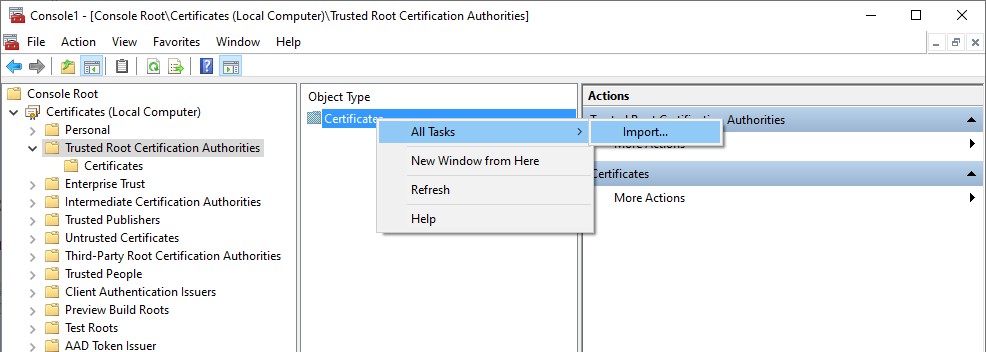
Step 9 – Select “Trusted Root Certification Authorities”, right-click “Certificates” and select “All Tasks” then “Import”
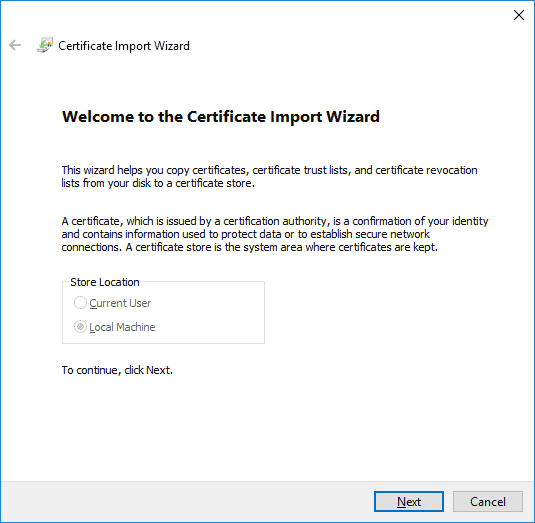
Step 10 – Click “Next” then Browse and locate the “rootSSL.pem” file we created in step 2
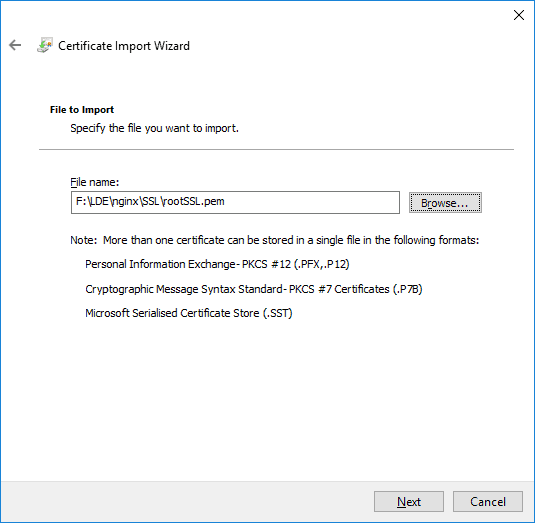
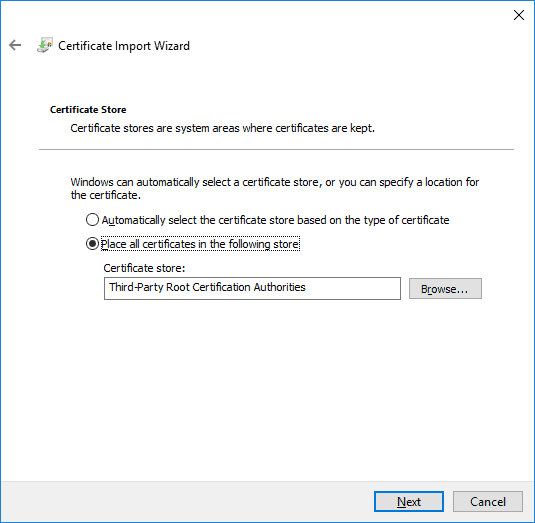
Step 11 – Select “Place all certificates in the following store” and select the “Trusted Root Certification Authorities store”. Click “Next” then click “Finish” to complete the wizard.
Browse the certificates to see yours in the list.
Now you can start issuing SSL certificates for all your local domains.
Issuing Certificates for Local Domains
Creating a Local Domain Site
I’m not going to cover setting up the actual site in Nginx or whatever web server you use.
The first step will be to create a local domain.
You do this in your c:\program files\windows\system32\drivers\etc\hosts file.
Here’s an example hosts file.
# Copyright (c) 1993-2009 Microsoft Corp.
#
# This is a sample HOSTS file used by Microsoft TCP/IP for Windows.
#
# This file contains the mappings of IP addresses to host names. Each # entry should be kept on an individual line. The IP address should
# be placed in the first column followed by the corresponding host name.
# The IP address and the host name should be separated by at least one
# space.
#
# Additionally, comments (such as these) may be inserted on individual
# lines or following the machine name denoted by a '#' symbol.
#
# For example:
#
#      102.54.94.97     rhino.acme.com          # source server
#       38.25.63.10     x.acme.com              # x client host
# localhost name resolution is handled within DNS itself.
# 127.0.0.1       localhost
# ::1

localhost 127.0.0.1 client-1.local
You can see that I’ve added a “client-1.local” domain to point to my local IP address 127.0.0.1
So “client-1.local” is the new website address and I want to connect to it using “https://client-1.local” on my local machine.
Let’s issue the certificate for this new local domain.
Create a Private Key for the New Domain
We’re going to create a file called “client-1.local.key” which contains the private key information for that domain.
In the same administrator command window type the following:
openssl req -new -sha256 -nodes -out client-1.local.csr -newkey rsa:2048 -keyout client-1.local.key -subj "/C=AU/ST=NSW/L=Sydney/O=Client One/OU=Dev/CN=client-1.local/[email protected]"

When you are issuing certificates for your own local domains, replace “client-1.local” with your local server domain name.
You can also change the “-subj” parameter to reflect your country, state, location etc.
Issue the New Certificate Using the Root SSL Certificate
In the same administrator command window type the following:
openssl x509 -req -in client-1.local.csr -CA rootSSL.pem -CAkey rootSSL.key -CAcreateserial -out client-1.local.crt -days 500 -sha256 -extensions "authorityKeyIdentifier=keyid,issuer\n basicConstraints=CA:FALSE\n keyUsage = digitalSignature, nonRepudiation, keyEncipherment, dataEncipherment\n subjectAltName=DNS:client-1.local"
When you are issuing certificates for your own local domains, replace “client-1.local” with your local server domain name.
Enter the password for the root SSL certificate when prompted.
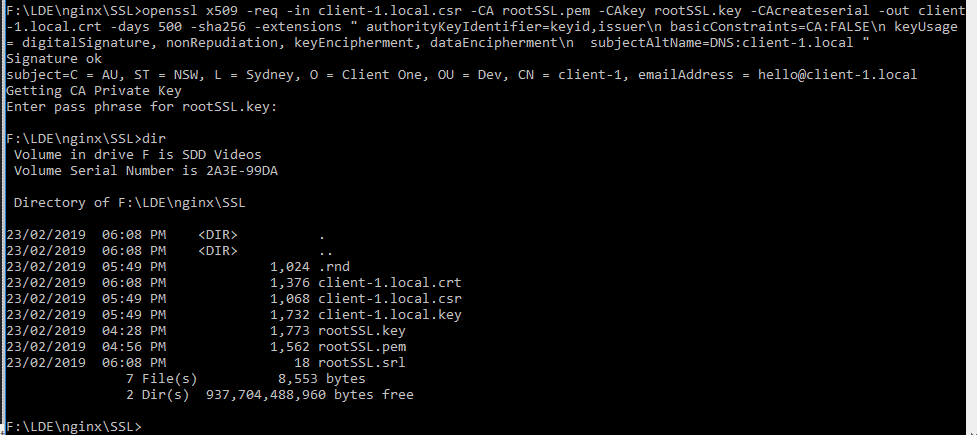
You can see all the files we have created; “client-1.local.crt” and “client-1.local.key” are the files you will need to add to your web server configuration for the local development site.
Using the New Local Domain Certificates in Your Web Server
The final part of this process is to add the certificate files to your web server’s website configuration for client-1.local.
Nginx
Here is an example of using the keys in an nginx server block.
Locate your nginx.conf file and within the server block where you define the local development site, add the new lines shown below:
server {
     listen       80;
     server_name  client-1.local;
     # New Lines below
     listen 443 ssl;
     ssl on;
     ssl_certificate f:/LDE/nginx/SSL/client-1.local.crt;
     ssl_certificate_key f:/LDE/nginx/SSL/client-1.local.key;
Apache
Locate your Apache httpd.cof or apache24.conf configuration file if you are using a single instance.
A typical Windows install will be in c:\program files\apache24\conf
More likely, if you are developing client sites, you have virtual servers set up for each client.
In this case, look for your httpd-vhosts.conf configuration file in your apache installation path.
Ass the SSL lines directly under the ServerName parameter, within your VirtualHost block.
<VirtualHost client-1.local>
     DocumentRoot f:/projects/client-1/www/
     ServerName client-1.local
     SSLEngine on
     SSLCertificateFile f:/LDE/nginx/SSL/client-1.local.crt
     SSLCertificateKeyFile f:/LDE/nginx/SSL/client-1.local.key;
</VirtualHost>
Restart Web Server
Restart the Windows web server service to load the new configuration and visit https://client1.local on your favourite browser.
Conclusion
The process to Get HTTPS working in Windows 10 is a bit fiddly I’ll agree with that, however, being able to run your local development sites securely over HTTPS with their own SSL certificate is worth it in my opinion as a WordPress developer.
If you are using WordPress you can now force the site to use HTTPS for better security.
Looking to level up your WordPress development skills?

I self-taught myself WordPress development, but this book took it to another level.
Each chapter builds upon the next, but you can also use it to jump into specific areas like WP Cron, WP REST endpoints, building a custom plugin repository etc.
If you’re like me and like having reference books at hand, this is the one that sits on my desk all the time.
