The JetPack WordPress plugin is jam packed with lots of great functionality including Infinite Scroll for your posts, removing the need for pagination.
What is Infinite Scroll?
The usual way that WordPress handles post listings is by pagination. At the bottom of a list of posts you will likely see either links to Older/Newer posts or a set of page numbers 1..10 with Prev/Next buttons for navigation.
Infinite Scroll works by detecting when a user gets to the bottom of a page that contains a list of posts and automatically checks for and loads in the next lot of posts.
It’s more than likely that your current theme will not be set up for using Infinite Scroll so you may have to change some of your theme’s code.
I guess the easiest way to check if your theme is compatible is to switch the feature on in the JetPack settings tab, go to a list of your posts and scroll to the end of the page.

If you see a little ajax spinner and a few seconds later a new set of posts appear at the end of the list then you’re theme is compatible – happy days.
Making Infinite Scroll work with your Theme
For most of you, I’m presuming you’re staring at the bottom of your list of posts and nothing has changed. Time to get dirty with some code hacking.
Fortunately JetPack provides a great support page for Infinite Scroll which describes how to add support to your theme.
You will at the very least need to add this basic code to your functions.php file in your active theme folder.
[gist id=8142780 file=code-snippet-1.php]
Line 5:
enables your theme to support the Infinite Scroll module
Line 6:
specifies the ID of the HTML element ( DIV ) where your scroll posts are located in and where to add more to. Usually this DIV will be called ‘content’ but you will need to check your theme’s source code to find out.
Line 7:
specifies your theme’s footer ID HTML element. Because posts are automatically appended to the page when you approach the bottom, it will be difficult for users to click on your actual footer line. Infinite Scroller provides a floating footer allowing users to navigate to the top of the page and display other information. Passing the ID of your theme’s footer HTML element allows Infinite Scroll to match the width so that it appears to be part of your theme.
The footer can be customised, sort of, with your own text and links. More on that later.
How to find your theme’s ‘container’ ID
For developers this will be a breeze but not everyone is a coder so let’s go back to line 6 (above) and explain how to find this HTML element and it’s ID.
For this I’m using the Chrome browser but it will work just as well with FireFox and Firebug.
Safari and IE users, sorry, you’ll need to do a bit of research to find out what developer tools are available for your browsers. If you find out, give me a shout and I’ll amend this and give you a little credit for doing the hard work!
First, open your website’s (blog) posts in the browser and right-click on your first posts title, then select Inspect Element.
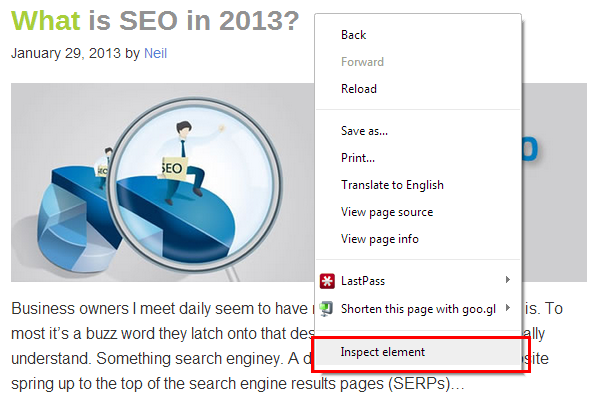
This will open the developers inspect element pane either to the bottom or to the right of the window.
If you had clicked on the title of your post, you will notice that the dev pane will be showing the HTML associated with the title element.
As you hover over elements in the dev pane, they are highlighted in the main browser window.
This is not a tutorial in using the Inspect Element feature of Chrome, so I’ll get right to the point. Let’s find the ID of your container.
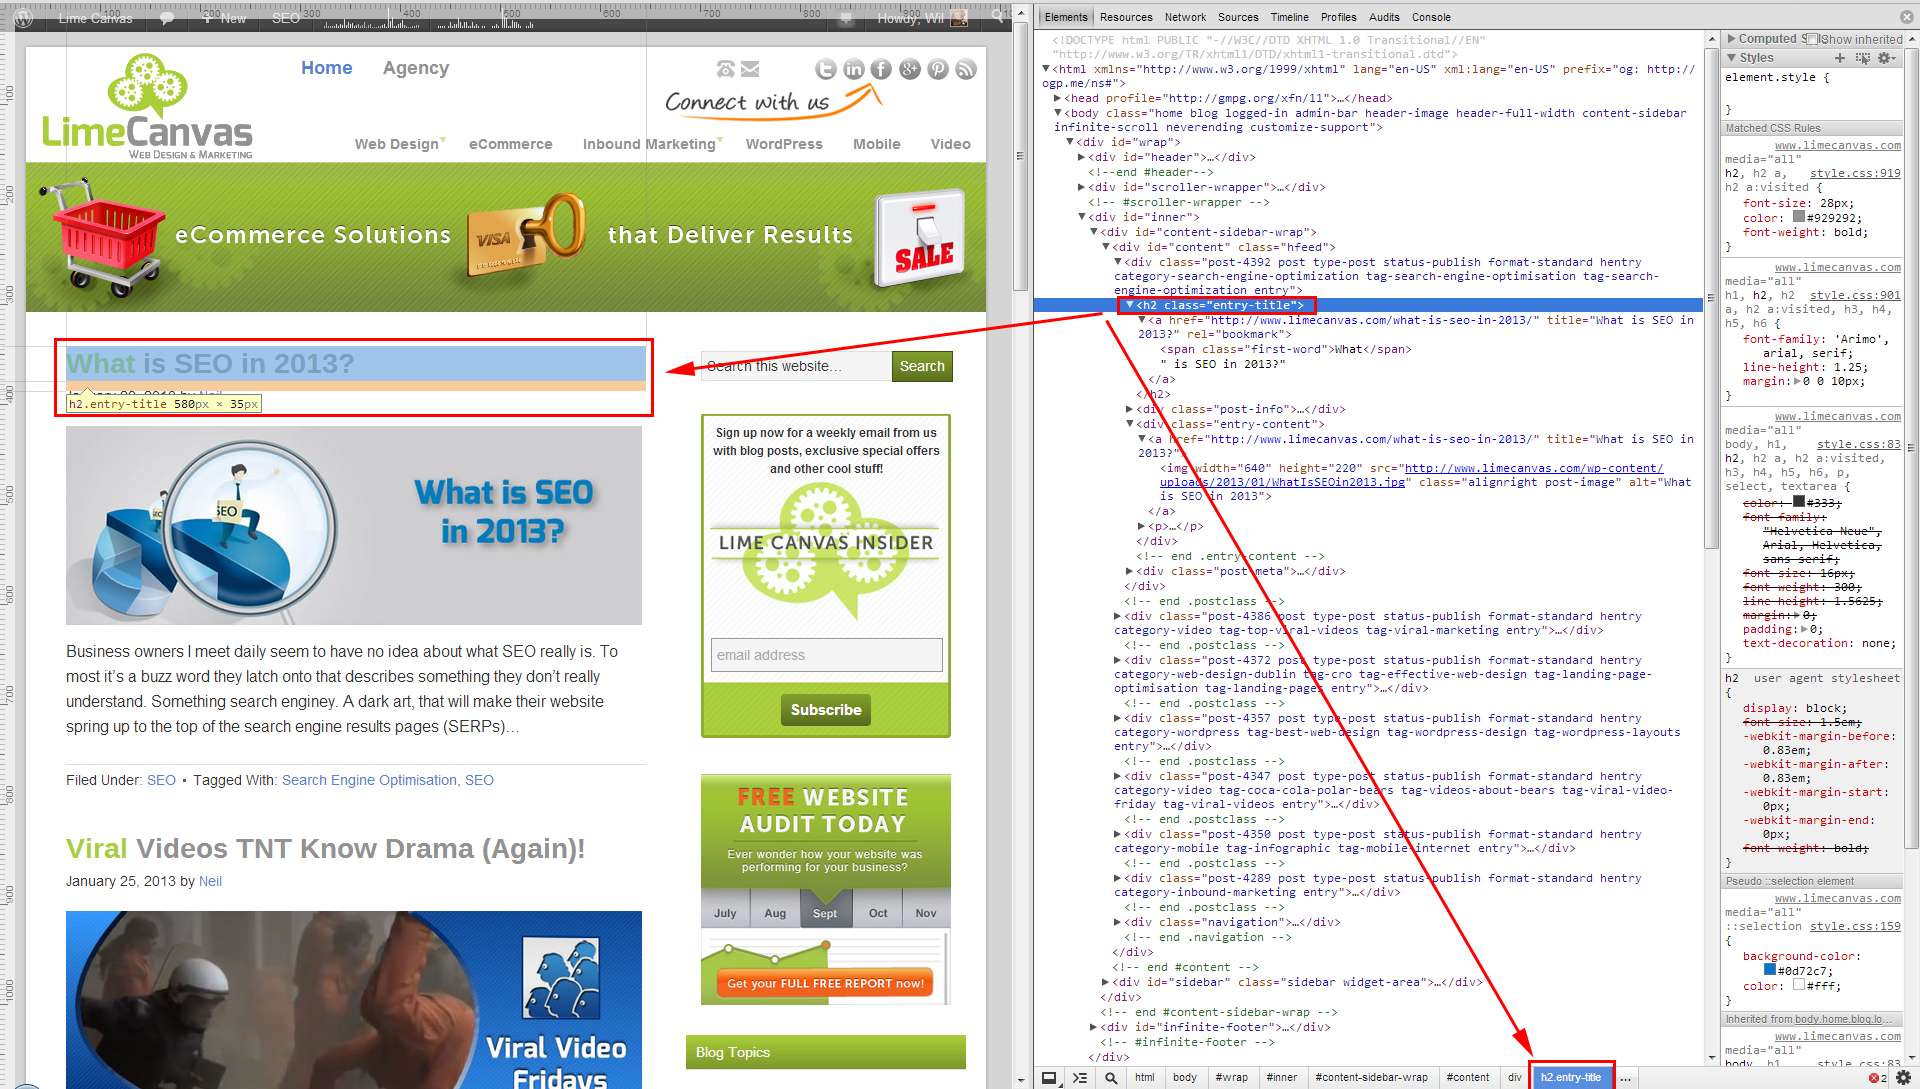
If you keep going up the list of HTML elements in the dev pane, you’ll come across a line that starts with
<div class=”post-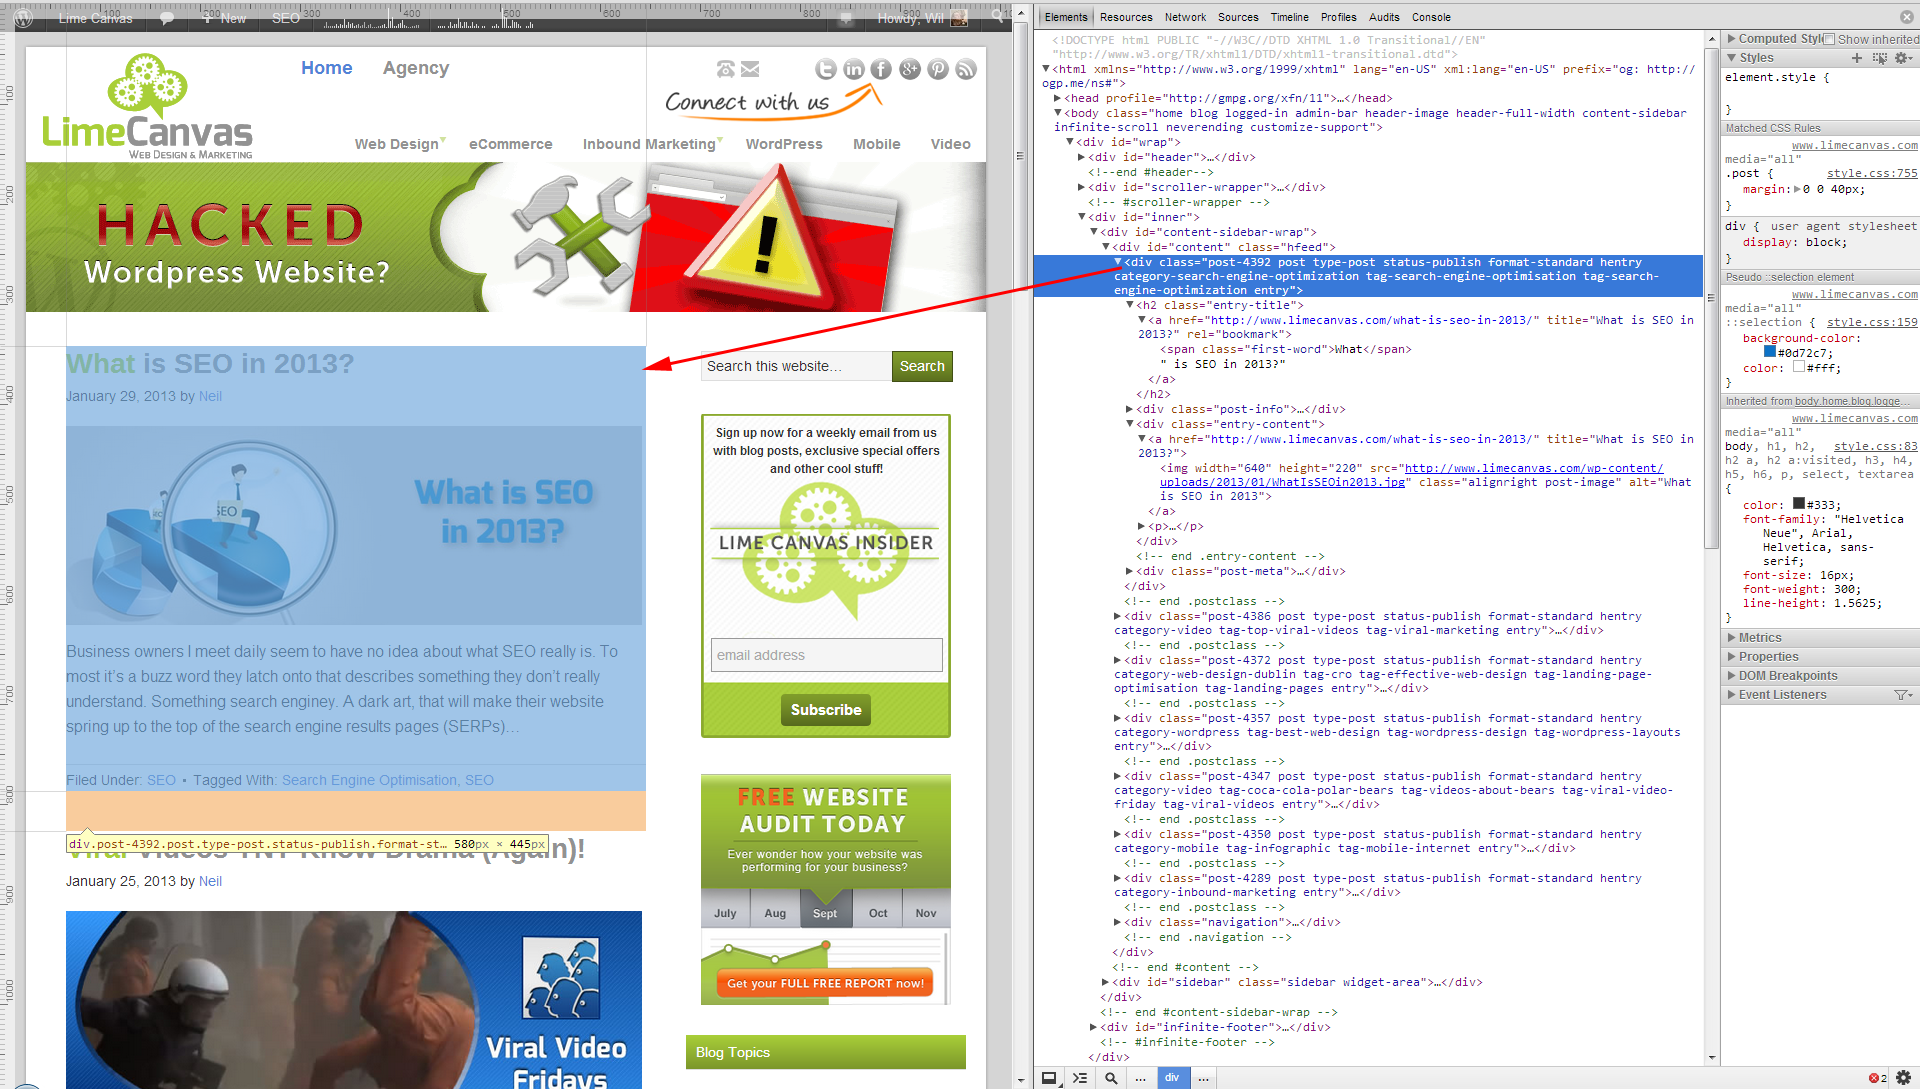
This is the element for just that first post. You can see it highlighted in the browser pane. We need all the posts and not just the first one.
Keep going up the tree until you see that all of your posts are highlighted together.
The next HTML element up for me is the one that starts with the line
<div id=”content” class=”hfeed”>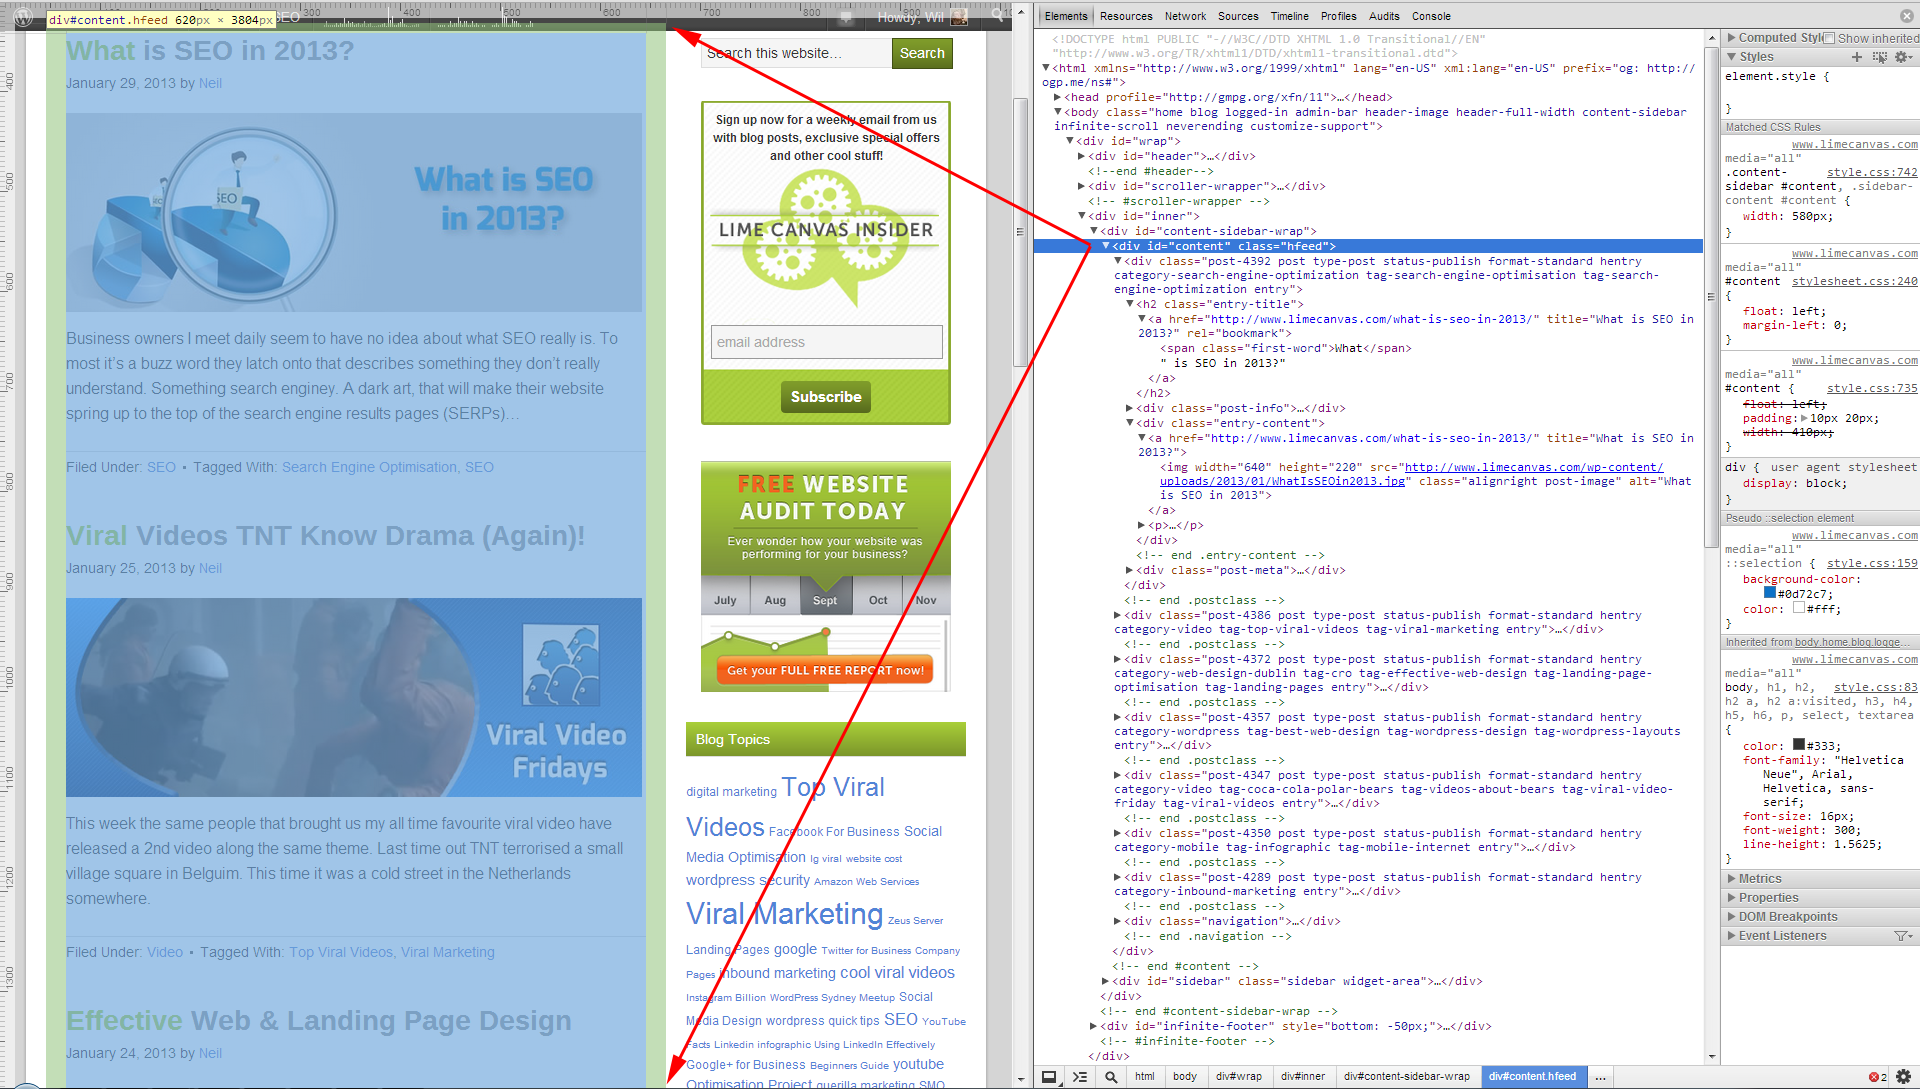
As you can see it has highlighted a strip that includes all the posts and nothing else (i.e. not the sidebar). This is the HTML element that you want and the ID field will contain the property name you are looking for to put into Line 6. In this case it is content.
Once the code is inserted into your functions.php file, refresh the page and scroll down to the bottom and see if your posts are automatically loaded in.
Twenty Ten/Eleven/Twelve Child Themes
If you are running any of the Twenty X themes, or child themes of these then you will have to add a little bit extra code to tie in with the way these themes display their posts.
Twenty Twelve Theme
Add the following code into your functions.php file:
[gist id=8142780 file=code-snippet-2.php]
The main difference for this code block is that you are wrapping up the theme support Lines 9-11 in another function Line 8 and then adding this function to be called when the theme runs the after_setup_theme() routine Line 13.
Twenty Eleven Theme
This is similar to the above but Twenty Eleven comes with widgets in the footer area, so these need to be added to the theme support function.
[gist id=8142780 file=code-snippet-3.php]
Twenty Ten Theme
Also similar to the above code block, however, the Twenty Ten theme uses a different way to display posts, by using template files starting with loop-. The theme uses an internal function called get_template_part() to determine which file to load.
[gist id=code file=code-snippet-4.php]
Line 7 adds the render attribute to point to a function on line 18 which calls the Twenty Ten function get_template_part( ‘loop’ ); to pull in the appropriate template file.
Styling the Footer
As mentioned earlier, Infinite Scroll provides a hover/pop-up footer at the bottom of the browser window.
![]()
The footer can be styled and modified.
We’ll run through the styling here and I’ll show you how to modify the footer in another post.
The first thing to do is to hide our footer when the Infinite Scroller is doing its work.
Add these lines to your theme’s style.css stylesheet:
[gist id=8142780 file=code-snippet-5.html]
When the Infinite Scroller is working it add some classes to the HTML body element.
Lines 3-6 hides your footer (HTML ID ‘footer’) and the Older/Newer Prev/Next navigation links when the scrolling is active.
Line 8-10 will restore your footer to the bottom of the page when all the posts have been loaded in.
To change the colour and links within the pop-up footer, use CSS to change the property #infinite-footer .container.
I’ve added prepended the HTML ID “body” so that it overrides the css that comes with the IS module.
Our CSS contains the following:
[gist id=8142780 file=code-snippet-6.css]
That should be enough to get you started with using the JetPack Infinite Scroller module.
Look out for my other posts where I’ll show you how to customise the contents of the footer and how to implement the Infinite Scroll into you Genesis theme.

Hi very good tutorial But can you tell me how to check how the theme is rendering post I mean i have a 3rd party theme so how do i check what loop or template system is used by it
Thanks
Usman Ghani
Hi Usman,
Most templates should work with the first method – as long as you can find out what your post container is using the images and arrows I included.
To find out exactly what your theme does, you’ll need to open the single.php file in your theme and determine how it handles posts. i.e. whether it looks up an eternal loop file or not.
Lastly you can always go back to the place you got your theme from and see if they have any documentation on the theme and its hooks.
Wil.
Hello and thank you for the great Tutorial!
Just so you know Safari allows us to inspect and element as well. Just right mouse click on section of a page, click on on inspect element and it will open the HTML viewer. Then we can move the mouse over the HTML text to see what gets highlighted. 🙂
That worked like a charm. Amazeballs!
I’ve some themes with infinity scroll.
http://www.paknetsol.com/blog/