 If you are a WordPress theme web developer here are some handy tips for customising the WordPress Admin Dashboard.
Yes, you can download plugins that will do some of these for you but why take the easy route when you can get a warm fuzzy feeling from hacking away at some code!
[Edit 05/07/2011 – WordPress 3.2 has just been released which includes changes to the Admin Dashboard UI. We’re looking into how this can be customised and will post an update soon.]
Replacing the WordPress Dashboard Logo
By default, the WordPress logo is shown at the top right of the admin dashboard.
This can be replaced with your own image, perhaps using a customer logo or something relevant to the website theme. The image below is a before and after example from one of our customer websites.

You will need to create a transparent GIF or PNG image 30 pixels wide and 31 pixels high.
If you’re unable to create a transparent image then you’ll need to make sure the background of your image matches the admin dashboard header.
In WordPress v2.x the background colour was #494949 and for v3.x this has been changed to #d7d7d7.
Copy the following code into your functions.php file and modify the filepath to your newly uploaded image.
[php]// Replace Admin Dashboard Logo
function wp_admin_dashboard_custom_logo() {
echo ‘<style type="text/css">#header-logo { background-image: url(‘.get_bloginfo(‘template_directory’).’/images/wordpress-admin-dashboard-logo.png) !important; }</style>’;
}
add_action(‘admin_head’, ‘wp_admin_dashboard_custom_logo’);[/php]
Changing the Default WordPress Dashboard Header Colour
The default colour of the admin dashboard header is a boring #d7d7d7 grey colour.
Here’s some simple code to change the header colour to dark blue. Copy it into your functions.php file.
[php]// Replace Admin Dashboard Header Colour
function wp_admin_dashboard_header_colour() {
echo ‘<style type="text/css">#wphead{background:#376f9e;}</style>’;
}
add_action(‘admin_head’, ‘wp_admin_dashboard_header_colour’);[/php]
Of course you may need to change the text colour in the header to match your new background color like the before and after image below.
Here’s a more comprehensive code snippet that we used in the above image.
[php]// Replace Admin Dashboard Header Colour
function wp_admin_dashboard_header_colour() {
echo ‘<style type="text/css">#wphead{background:#376f9e;
background-image: -webkit-gradient(linear, 0% 100%, 0% 0%, from(#376f9e), to(#478fcb));
}
#wphead h1#site-heading a{color: #ddd;}
#wphead h1#site-heading a:hover{color: #fff;}
#wphead #wphead-info #user_info{color: #ddd;}
#wphead #wphead-info #user_info a{color: #ddd;}
#wphead #wphead-info #user_info a:hover{color: #fff;}
</style>’;
}
add_action(‘admin_head’, ‘wp_admin_dashboard_header_colour’);[/php]
Change the CSS code to suit your own theme branding.
Removing the WordPress Dashboard Menus
Sometimes you may find that you don’t use the core functionalities that WordPress offers in your designed theme.
Why not remove the admin dashboard menus that are not needed?
It will tidy up the interface and stop customers clicking into parts of the interface that you haven’t modified or used.
Paste this code into your theme’s function.php file to remove the left-hand-side “Settings” and “Plugins” menus from the admin dashboard.
[php]// Remove Admin Dashboard menus
function wp_admin_dashboard_remove_menus() {
global $menu;
$restricted = array(__(‘Settings’), __(‘Plugins’));
end ($menu);
while (prev($menu)){
$value = explode(‘ ‘,$menu[key($menu)][0]);
if(in_array($value[0] != NULL?$value[0]:"" , $restricted)){unset($menu[key($menu)]);}
}
}
add_action(‘admin_menu’, ‘wp_admin_dashboard_remove_menus’);[/php]
This is just a simple example but you could expand the code to restrict menu items based on user roles or IDs.
The full list of menu items are:
[php]$restricted = array(__(‘Dashboard’), __(‘Posts’), __(‘Media’), __(‘Links’), __(‘Pages’), __(‘Appearance’), __(‘Tools’), __(‘Users’), __(‘Settings’), __(‘Comments’), __(‘Plugins’));[/php]
Removing WordPress Dashboard Widgets and Creating New Ones
The number of dashboard widgets can overwhelm some customers when thy first log in to the WordPress admin dashboard.
Here’s how to declutter the area, removing the “Plugins”, “WordPress Blog” and “Other WordPress News” dashboard widgets and creating a new “Help and Support” widget.
Copy the code into your theme’s functions.php file.
[php]// Remove and Create Custom Dashboard Widgets
function wp_admin_dashboard_customise() {
// Globalise and get access to the widgets and current user info
global $wp_meta_boxes, $current_user;
// Remove Incoming Links widget for authors and editors
if(in_array(‘author’, $current_user->roles) || in_array(‘editor’, $current_user->roles)){
unset($wp_meta_boxes[‘dashboard’][‘normal ‘][‘core’][‘dashboard_incoming_links’]);
}
// Remove widget: Plugins, WordPress Blog and Other WordPress News
unset($wp_meta_boxes[‘dashboard’][‘normal’][‘core’][‘dashboard_plugins’]);
unset($wp_meta_boxes[‘dashboard’][‘side’][‘core’][‘dashboard_primary’]);
unset($wp_meta_boxes[‘dashboard’][‘side’][‘core’][‘dashboard_secondary’]);
// Create a call back function for our new widget
wp_add_dashboard_widget(‘custom_help_widget’, ‘Help and Support’, ‘wp_admin_dashboard_help_widget’);
}
add_action(‘wp_dashboard_setup’, ‘wp_admin_dashboard_customise’);
//Our new dashboard widget
function wp_admin_dashboard_help_widget() {
echo ‘<p>If you need help with this theme you can contact the developer <a href="http://www.gravitationalfx.com/clients/" target="_blank" title="Gravitational FX">here</a>.</p>’;
}[/php]
Our new widget should appear on the admin dashboard looking like this.

Get more information on how you can control the admin dashboard widgets from the WordPress Codex
Removing the “WordPress x.x.x is available! Please Update Now” Message Banner
WordPress does a pretty good job of letting you know when a new version is available, however, circumstances may dictate that only a particular user role or ID can perform that update.
![]()
Here’s the code that will remove the WordPress update banner for non-administrators. Paste it into your theme’s functions.php file.
[php]// Remove "Please Update Now" notice from non-admins
if ( !current_user_can( ‘edit_users’ ) ) {
add_action( ‘init’, create_function( ‘$a’, "remove_action( ‘init’, ‘wp_version_check’ );" ), 2 );
add_filter( ‘pre_option_update_core’, create_function( ‘$a’, "return null;" ) );
add_filter( ‘pre_site_transient_update_core’, create_function( ‘$a’, "return null;" ) );
}[/php]
Of course you can extend the code for your own web design projects and make it as complex or simple as you like.
Adding a Warning Box to the Settings Menu
When handing your WordPress theme over to a customer they will inevitably ask for an Administrator login – and quite rightly so.
Unfortunately, from experience, you know that customers will go into the Settings menu and start to modify some of the options there.
The very least we can do is provide a warning to say that this may cause problems to the website and ultimately our sanity; “What the frak did you go and change that setting for!”
Here’s some code that will add a nice “I told you so” warning box to the top of the settings menu on the Admin Dashboard using the same style as those annoying useful WordPress update boxes.
![]()
Add this code to your theme’s functions.php file.
[php]// Add a warning box to the settings page
// Uses the same style box as the WordPress Update "update-nag"
function my_admin_notice(){
global $current_screen;
if ( $current_screen->parent_base == ‘options-general’ ){
echo ‘<div id="admin-settings-warning-box"><strong>Warning</strong> – changing settings on these pages may cause problems with your website’s design!</div>’;
}
}
add_action(‘admin_notices’, ‘my_admin_notice’);[/php]
Adding your Company’s News Feed to the Admin Dashboard
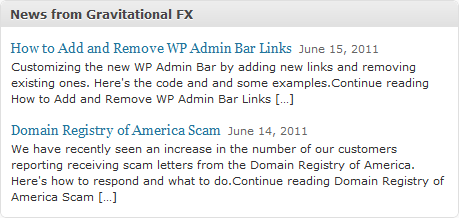
Keep in touch with your customers after you have deployed a custom WordPress theme by adding your company’s news feed to their Admin Dashboard.

Here’s the code to include in your theme’s functions.php file.
[php]// Adding a news feed widget to the dashboard
function wp_admin_dashboard_add_news_feed_widget() {
global $wp_meta_boxes;
// Our new dashboard widget
wp_add_dashboard_widget( ‘dashboard_gravfx_feed’, ‘News from Gravitational FX’, ‘dashboard_gravfx_feed_output’ );
}
add_action(‘wp_dashboard_setup’, ‘wp_admin_dashboard_add_news_feed_widget’);
function dashboard_gravfx_feed_output() {
echo ‘<div>’;
wp_widget_rss_output(array(
‘url’ => ‘http://www.gravitationalfx.com/feed/’,
‘title’ => ‘Latest news from Gravitational FX’,
‘items’ => 2,
‘show_summary’ => 1,
‘show_author’ => 0,
‘show_date’ => 1
));
echo "</div>";
}[/php]
Adding a Custom Admin Dashboard Footer
You’ve went through all the time and effort of creating a new WordPress theme for your customer.
Why not give yourself some credit in the Admin Dashboard footer, giving due credit to WordPress at the same time?
Add the following code to your theme’s functions.php file.
[php]// Add your own Admin Dashboard footer credits
function wp_admin_dashboard_custom_footer_text( $default_text ) {
return ‘<span id="footer-thankyou">Website created by <a href="http://www.www.gravitationalfx.com" target="_blank" title="Affordable Web Design in Dublin Ireland">Gravitational FX</a><span> | Powered by <a href="http://www.wordpress.org" target="_blank">WordPress</a>’;
}
add_filter( ‘admin_footer_text’, ‘wp_admin_dashboard_custom_footer_text’ );[/php]
Removing “Faourite Actions” from the Admin Dashboard Header
Along the top right of the Admin Dashboard header is the “favourite actions” drop-down menu (see before and after image below).

By default the menu contains quick link to New Post, Drafts, New Page, Upload and Comments.
Copy the following code into your functions.php file to completely remove the drop-down.
[php]// Remove the favourite actions drop-down menu
function wp_admin_dashboard_remove_fav_actions(){
return array();
}
add_filter(‘favorite_actions’,’wp_admin_dashboard_remove_fav_actions’);[/php]
In Summary
WordPress theme designers shouldn’t stop at the front-end design of a web site.
Customising the WordPress Admin Dashboard is not only a sensible idea for lowering potential support calls, it is essential for completing the brand identity of the website.
Putting in that little bit of extra effort will keep your customers happy and will give you the answer to the question “What makes you different from all those other web designers out there?”

3 Responses
Good stuff, thank you Wil!
I’m looking into the following challenge, which I believe is closely related to your article.
I would like to add items to the left-hand menu column of the dashboard. For example, rather than editing the footer.php content via Appearance -> Editor -> footer-.php, I’d like to have an item named “Footer” in the left-hand column. When user clicks on it a “footer” content editing section would open in the center of the dashboard, much like a page or post in editing mode.
Also, I’d like to create customer php files for “boxes”, e.g. “box1.php”, “box2.php” etc, which can then be hooked into page templates so that their content would display on the front-end. I’d like to create left-column menu items for those boxed in the dashboard admin as well, much the same way as the footer example above.
I have a feeling you would know how to go about this… 🙂
Cheers,
Jos
Good work. Thanks
Great stuff Wil! I’m trying to change the sidebar menu to a horizontal static top menu. I’m going to use bootstrap 3 as the css framework. I was hoping to see if you had any ideas on how to make this painless lol!
Jason