In this lunchtime WPQuickies, I’ll be showing current or budding developers how to start using the WordPress debug log in your PHP themes and plugins.
Let’s face up to facts. We’re not all perfect and we’re going to make mistakes when developing that WordPress theme or plugin.
Sure, turning on visual debugging is a step forward but having a written log of issues that you can refer back to, I think is essential for a debugging process.
In this WPQuikies, I’ll show you how to enable the WordPress debug mode and how to write your own custom errors to the debug log file.
Enabling WordPress Debugging
It’s pretty easy to enable debugging for WordPress.
Locate your WordPress configuration file wp-config.php.
Do a quick search for the word “WP_DEBUG” and see if there are any existing lines in the configuration file.
Sometimes web hosts add the debugging lines if there have been issues in the past.
If there are no references to WP_DEBUG, you need to add the following three lines anywhere in the file above the line
 /* That's all, stop editing! Happy blogging. */
 define( 'WP_DEBUG', true );
 define( 'WP_DEBUG_DISPLAY', false );
 define( 'WP_DEBUG_LOG', true );
These control the basic WordPress debugging.
The first line define( ‘WP_DEBUG’, true ); turns on the WordPress debugging mode.
Setting this to false turns off debugging mode and WordPress will ignore any other debug options set in the configuration file.
The second line define( ‘WP_DEBUG_DISPLAY’, false ); turns off the debug output to the screen.
I really hate having all the PHP errors being displayed on the screen – it’s of no use to me at all and you certainly wouldn’t want this option on in a production environment.
Unfortunately, it is set to true by default so you have to explicitly add this line and set it to false to disable screen output.
The third line define( ‘WP_DEBUG_LOG’, true ); enables logging to the default debug.log file and is written to your /wp-content/ folder.
Advanced WordPress Debugging Options
If you are looking to get more logging entries back from libraries during your development you can add the following line to your wp-config.php file.
define( ‘SCRIPT_DEBUG’, true );This forces WordPress to use the development libraries which often are a lot more verbose than those used in final production.
If you are trying to debug what is going on in the database querying, you can add the following line to your wp-config.php file.
define( ‘SAVEQUERIES’, true );This saves the database queries to an array which is then written to the debug.log.
Note: all debugging will have a performance hit on the server, especially these last two lines, so use them sparingly if you have to debug on a production server.
Renaming the Default WordPress Debug Log File
I have a blog post at https://zeropointdevelopment.com/how-to-rename-the-wordpress-debug-log/ which shows you how to rename the default debug.log file path and name.
I usually rename the file and prefix it with a tilda ~ and change the file path to the same as the wp-config.php file, just so I don’t have to be clicking up into another folder.
I have all of my project files in Dropbox so I can sync them across my devices.
Dropbox ignores files that are prefixed with a tilda and I find that useful because my configuration environment is slightly different on each of my machines and I don’t want the debug.log file syncing between machines for that reason.
TL;DR
To enable this feature, replace the line
define( ‘WP_DEBUG_LOG’, true );With three lines of code:
 define( 'WP_DEBUG_LOG', false );
 ini_set( 'log_errors', 1 );
 ini_set( 'error_log', dirname(__FILE__)  . '/~$debug.log' );
The WordPress Debug Log
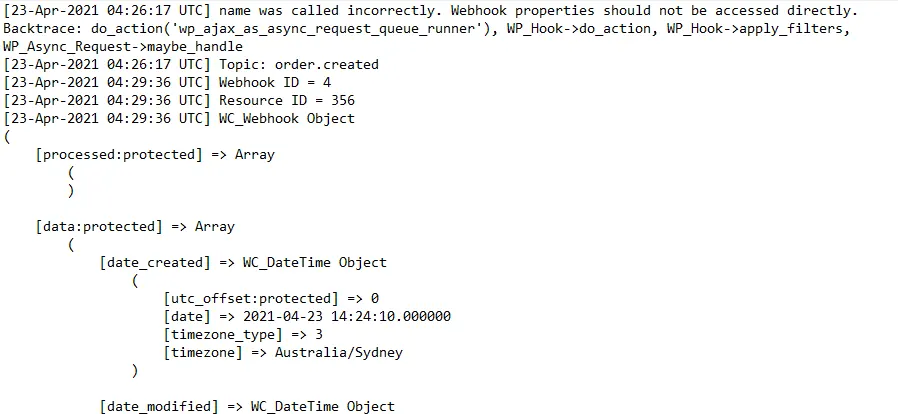
Here’s a screenshot of what a typical debug.log file looks like.

Every new entry starts with a date and time stamp in square brackets, on a new line, followed by the debug output.
You will normally find notices, warnings and error messages.
Notices are something of note that you should probably address at some point.
Warnings are likely to cause an issue if not addressed soon.
Errors are what they say and can cause things not to work including PHP causing the infamous white screen of death.
Writing Your Own WordPress Debug Info To The Log
Writing directly to the log file using the built-in PHP function error_log() can cause problems with formatting for certain data objects.
I suggest you create a wrapper function that properly formats arrays and objects for writing to the log.
 if ( ! function_exists('write_log')) {
    function write_log ( $log )  {
       if ( is_array( $log ) || is_object( $log ) ) {
          error_log( print_r( $log, true ) );
       } else {
          error_log( $log );
       }
    }
 }
You can add this to your theme’s functions.php file or include it in a basic plugin.
Using the function is simple.
 if ( is_user_logged_in() ) {
          $user_id = get_current_user_id();
          write_log( ‘Processing user ID: ‘ . $user_id );
 }
 write_log( __LINE__ . ‘Beginning post SEO analysis.’ );
WordPress Debug Log Summary
That’s my overview of using the WordPress debugging mode and writing your own information to the debug log.
Remember that this debug log just captures PHP errors. JavaScript errors are output to the browsers console log.
#WPQuickies
Join me every Thursday at 1 pm Sydney time for some more WPQuickies – WordPress tips and tricks in thirty minutes or less.
Broadcasting live on YouTube and Facebook.
Suggest a #WPQuickies Topic
If you have an WordPress topic you’d like to see explained in 30 mins or under, fill out the form below.
https://forms.gle/mMWCNd3L2cyDFBA57
Watch Previous WPQuickies


