Removing the WordPress header and footer on landing pages helps with conversions.
I’ll show you an easy way to remove the WordPress header and footer from any page on your site.
The WordPress Header & Footer
By default, WordPress outputs a header and a footer on all single pages.
This is the header from my wilbrown.com website. It contains the logo in the top left corner and the menu on the right.

This is the footer from my wilbrown.com website. It contains a menu containing links to my privacy policy, code of conduct, terms and conditions and acknowledgement to the country and the copyright for the site.

The header and footer are displayed throughout the website’s single pages and contain helpful information and links.
However, if you are creating a sales or landing page, they become distractions.
WordPress core has no easy checkbox or options for disabling the header and footer output on single pages, so we need to find a way to remove these elements from our landing pages.
Methods To Hide the WordPress Header & Footer
There are several ways to hide WordPress’ header and footer on single pages.
The most common methods are:
- Theme Options
- PHP Theme Page Template
- Page Builder
- Custom CSS
Today I’ll look at the last option, hiding the WordPress header and footer on single pages using CSS.
Why Remove WordPress Header & Footer From Pages?
There could be a range of reasons you may want to remove the header and footer from WordPress pages, but the most common reason is to increase conversions for a landing page.
A landing page is a particular page on your website with a singular laser-focused call to action you want the visitor to take.
Any other links on the page distract from the call to action and can lower the conversion rate of visitors taking action.
Digital marketing company Hubspot A/B tested landing pages with and without navigation links in the header, and their data suggests an increase in conversion rates without distractions.
How To Locate the WordPress Header & Footer
CSS targets HTML elements, so we need to be able to locate the WordPress header and footer elements in the code of the website.
These HTML elements are usually <header> and <footer> however, some themes can define different elements for the header and footer, so we can’t assume these HTML elements are present.

Fortunately, you don’t have to troll through the page source code to find these elements, the popular web browsers have a tool to help you find and navigate through a web page’s HTML code.
Web Browser Inspect Element Tool
You saw a sneak peek on the previous slide of Chrome’s Inspect Element Tool, and it’s a super helpful tool for beginners to find HTML elements on a web page and determine their class names or IDs.
The Inspect Element tool is available in Chrome, MS Edge, Safari and Firefox.
Hubspot has a great article on opening Inspect Element on each browser.
There are several ways to open the Inspect Element tool in Chrome.
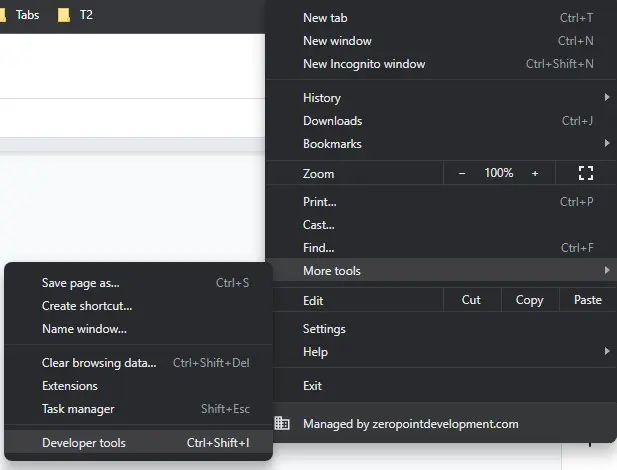
Method 1: From the three vertical dots in the top right of the browser, choose More tools > Developer tools
Method 2: Click on Ctrl + Shift + I (the letter i) or Ctrl + Shift + C.
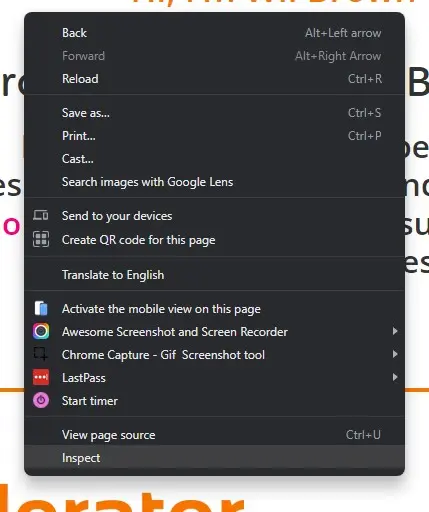
Method 3: Right-click anywhere on the web page and choose “Inspect” at the bottom of the popup menu. Right-clicking on a specific element on the page will usually load the inspector tool at that element.
When the inspector is open, you can use the element selector tool or Ctrl + Shift + C and select the element on the web page. Each HTML element will highlight as you move over them.
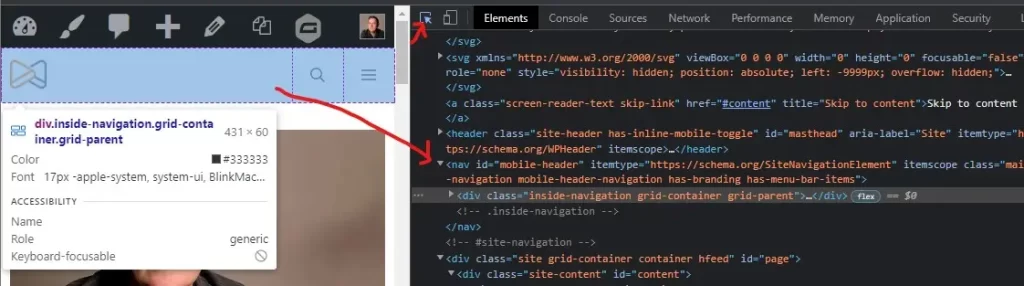
On the right-hand side, you will see the Elements view, and to the right, the Styles view, which shows which styles are applied to the selected HTML element or associated class or ID.
Using the Inspect Element Tool To Find Elements, Classes and IDs
Using the Inspect Element tool, you can find the HTML element name and all the class names or the ID it uses, allowing you to target that specific element.
Sometimes you may have to follow the hierarchy up a few HTML elements to find the parent element you want to target.
In this example, the inspector tool has highlighted a div with the leading class name “inside-navigation”.
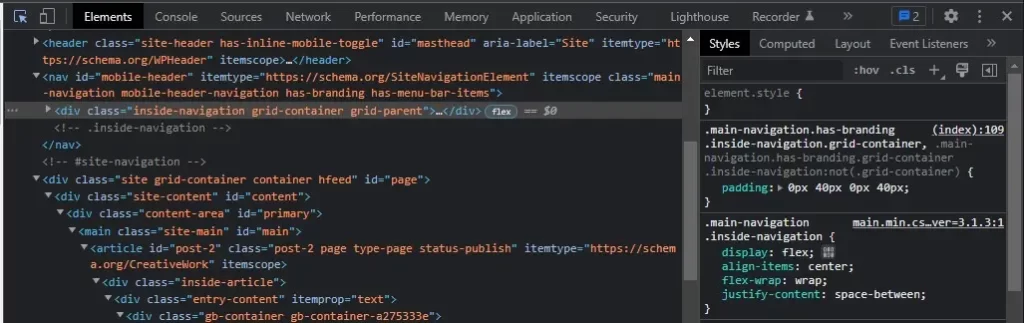
If we look up the hierarchy, we can see that element is contained in a parent element called “<header>”.
If we want to remove the entire header properly, we should target the parent element with CSS.
Here’s the HTML element we are trying to remove in the source code.
<header class="site-header has-inline-mobile-toggle" id="masthead" aria-label="Site" itemtype="https://schema.org/WPHeader" itemscope="">In CSS, we could target the <header> element directly or use the “site-header” class or use the “masthead” ID.
Though there could be multiple <header> elements on a single page, class names are not unique. HTML IDs are unique, so in this case, we could use the HTML ID “masthead” or a combination of the element name, class name and ID.
How To Write Basic CSS
In CSS this translates to: “header.site-header”.
HTML elements are enclosed in angle brackets.
We write HTML elements using their name, dropping the angle bracket when writing CSS.
Class names start with a period, and IDs start with a hash.
e.g.
<header>" becomes header
class="site-header" becomes .site-header
id="masthead" becomes #masthead
The CSS we need to write to hide the header element is:
header#masthead{
  display:none;
}
I’ll show you where to put the CSS later.
Targeting a Specific WordPress Page With CSS
We don’t want to remove the header element across the entire website, just on a specific page.
WordPress assigns a unique ID for every post (and page) on your website.
Use the Inspect Element to find the <body> HTML element of the page you want to remove the header from.
The body HTML element is close to the top of the web page source code.
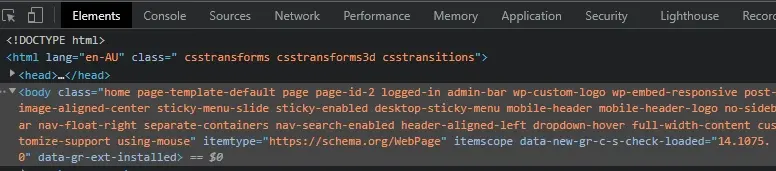
In this example, the body element is:
<body class="home page-template-default page page-id-2 logged-in admin-bar wp-custom-logo wp-embed-responsive post-image-aligned-center sticky-menu-slide sticky-enabled desktop-sticky-menu mobile-header mobile-header-logo no-sidebar nav-float-right separate-containers nav-search-enabled header-aligned-left dropdown-hover full-width-content customize-support using-mouse" itemtype="https://schema.org/WebPage" itemscope="" data-new-gr-c-s-check-loaded="14.1075.0" data-gr-ext-installed="">
There’s a lot of stuff going on in that body element and we’re looking for a specific class name.
Every WordPress page has a class name with the following format “page-id-X” where X is the post (or page) ID.
In our example, we can see a class named “page-id-2” in the body element.
So this page has the unique WordPress post ID of number two.
To target just this specific page with CSS we would use the code “body.page-id-2”.
Because the header element is inside the body element the final CSS we need to use to hide the header on just this page is:
body.page-id-2 header#masthead{
  display:none;
}
The ID number will be different for your page than in the above example.
Adding CSS Using the Customiser
Open the customiser from the top admin bar and navigate to “Additional CSS” to expand the section. It’s usually at the bottom of the menu.

Copy the final CSS code into the editor window and if you are previewing the same page as before with body class name “page-id-2″ you should see the header area disappear in the preview window.

Click on the Publish button to make the CSS change permanent.
Removing the WordPress Footer
Repeat this process to find the footer area of your web page.
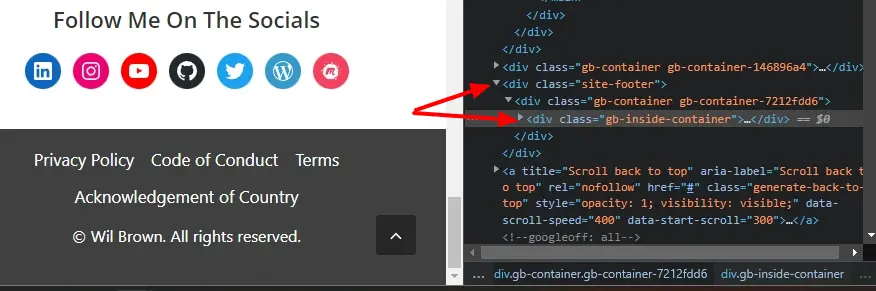
In this example, the inspector highlights a div with class “gb-inside-container” ,and it’s parent is a div with a class name of “site-footer”.
The HTML we are trying to hide are these lines:
<div class="site-footer">
	<div class="gb-container gb-container-7212fdd6">
In this example the native HTML <footer> element is not being used, instead a <div> element with a class name of “site-footer” is used.
We still only want to remove the footer from this same single page, so the final CSS code to remove the footer will be:
body.page-id-2 .site-footer{
  display:none;
}
Copy this code into the customiser additional CSS section to remove the footer from this specific WordPress page.
Summary
Once you master the web browser’s Inspect Element tool, targeting HTML elements with CSS and IDs easily allows you to hide the WordPress head and footer on your landing pages.
#WPQuickies
Join me every Thursday at 1 pm Sydney time for some more WPQuickies – WordPress tips and tricks in thirty minutes or less.
Broadcasting live on YouTube and Facebook.
Suggest a #WPQuickies Topic
If you have a WordPress topic you want to see explained in 30 mins or under, fill out the form below.
https://forms.gle/mMWCNd3L2cyDFBA57
Watch Previous WPQuickies
-

How To Reduce TTFB and Improve Page Load Speed
-

Get Data From Multiple Tables Using SQL
-

How To Move WordPress To Another Web Host – WPQuickies
-
Who Owns WordPress? – WPQuickies
-
Will Page Builders Replace Web Designers & Developers? – WPQuickies
-

WordPress Updates: How Do They Work? – WPQuickies
-
Remove WordPress Header and Footer Using CSS – WPQuickies
-
WordPress Slugs What Are They & How To Change Them – WPQuickies

